:::: MENU ::::

Howk IT-Dienstleistungen

Howk IT Services – Howk IT-Dienstleistungen

Posts Categorized / Hi Tech

  • Dec 31 / 2018
  • 0
Hi Tech

Blog: Dynamically Expand Volume with CSI and Kubernetes

Author: Orain Xiong (Co-Founder, WoquTech)

There is a very powerful storage subsystem within Kubernetes itself, covering a fairly broad spectrum of use cases. Whereas, when planning to build a product-grade relational database platform with Kubernetes, we face a big challenge: coming up with storage. This article describes how to extend latest Container Storage Interface 0.2.0 and integrate with Kubernetes, and demonstrates the essential facet of dynamically expanding volume capacity.

Introduction

As we focalize our customers, especially in financial space, there is a huge upswell in the adoption of container orchestration technology.

They are looking forward to open source solutions to redesign already existing monolithic applications, which have been running for several years on virtualization infrastructure or bare metal.

Considering extensibility and the extent of technical maturity, Kubernetes and Docker are at the very top of the list. But migrating monolithic applications to a distributed orchestration like Kubernetes is challenging, the relational database is critical for the migration.

With respect to the relational database, we should pay attention to storage. There is a very powerful storage subsystem within Kubernetes itself. It is very useful and covers a fairly broad spectrum of use cases. When planning to run a relational database with Kubernetes in production, we face a big challenge: coming up with storage. There are still some fundamental functionalities which are left unimplemented. Specifically, dynamically expanding volume. It sounds boring but is highly required, except for actions like create and delete and mount and unmount.

Currently, expanding volume is only available with those storage provisioners:

  • gcePersistentDisk
  • awsElasticBlockStore
  • OpenStack Cinder
  • glusterfs
  • rbd

In order to enable this feature, we should set feature gate ExpandPersistentVolumes true and turn on the PersistentVolumeClaimResize admission plugin. Once PersistentVolumeClaimResize has been enabled, resizing will be allowed by a Storage Class whose allowVolumeExpansion field is set to true.

Unfortunately, dynamically expanding volume through the Container Storage Interface (CSI) and Kubernetes is unavailable, even though the underlying storage providers have this feature.

This article will give a simplified view of CSI, followed by a walkthrough of how to introduce a new expanding volume feature on the existing CSI and Kubernetes. Finally, the article will demonstrate how to dynamically expand volume capacity.

Container Storage Interface (CSI)

To have a better understanding of what we’re going to do, the first thing we need to know is what the Container Storage Interface is. Currently, there are still some problems for already existing storage subsystem within Kubernetes. Storage driver code is maintained in the Kubernetes core repository which is difficult to test. But beyond that, Kubernetes needs to give permissions to storage vendors to check code into the Kubernetes core repository. Ideally, that should be implemented externally.

CSI is designed to define an industry standard that will enable storage providers who enable CSI to be available across container orchestration systems that support CSI.

This diagram depicts a kind of high-level Kubernetes archetypes integrated with CSI:

csi diagram

  • Three new external components are introduced to decouple Kubernetes and Storage Provider logic
  • Blue arrows present the conventional way to call against API Server
  • Red arrows present gRPC to call against Volume Driver

For more details, please visit: https://github.com/container-storage-interface/spec/blob/master/spec.md

Extend CSI and Kubernetes

In order to enable the feature of expanding volume atop Kubernetes, we should extend several components including CSI specification, “in-tree” volume plugin, external-provisioner and external-attacher.

Extend CSI spec

The feature of expanding volume is still undefined in latest CSI 0.2.0. The new 3 RPCs, including RequiresFSResize and ControllerResizeVolume and NodeResizeVolume, should be introduced.

service Controller {
 rpc CreateVolume (CreateVolumeRequest)
   returns (CreateVolumeResponse) {}
……
 rpc RequiresFSResize (RequiresFSResizeRequest)
   returns (RequiresFSResizeResponse) {}
 rpc ControllerResizeVolume (ControllerResizeVolumeRequest)
   returns (ControllerResizeVolumeResponse) {}
}

service Node {
 rpc NodeStageVolume (NodeStageVolumeRequest)
   returns (NodeStageVolumeResponse) {}
……
 rpc NodeResizeVolume (NodeResizeVolumeRequest)
   returns (NodeResizeVolumeResponse) {}
}

Extend “In-Tree” Volume Plugin

In addition to the extend CSI specification, the csiPlugin interface within Kubernetes should also implement expandablePlugin. The csiPlugin interface will expand PersistentVolumeClaim representing for ExpanderController.

type ExpandableVolumePlugin interface {
VolumePlugin
ExpandVolumeDevice(spec Spec, newSize resource.Quantity, oldSize resource.Quantity) (resource.Quantity, error)
RequiresFSResize() bool
}

Implement Volume Driver

Finally, to abstract complexity of the implementation, we should hard code the separate storage provider management logic into the following functions which is well-defined in the CSI specification:

  • CreateVolume
  • DeleteVolume
  • ControllerPublishVolume
  • ControllerUnpublishVolume
  • ValidateVolumeCapabilities
  • ListVolumes
  • GetCapacity
  • ControllerGetCapabilities
  • RequiresFSResize
  • ControllerResizeVolume

Demonstration

Let’s demonstrate this feature with a concrete user case.

  • Create storage class for CSI storage provisioner
allowVolumeExpansion: true
apiVersion: storage.k8s.io/v1
kind: StorageClass
metadata:
  name: csi-qcfs
parameters:
  csiProvisionerSecretName: orain-test
  csiProvisionerSecretNamespace: default
provisioner: csi-qcfsplugin
reclaimPolicy: Delete
volumeBindingMode: Immediate
  • Deploy CSI Volume Driver including storage provisioner csi-qcfsplugin across Kubernetes cluster

  • Create PVC qcfs-pvc which will be dynamically provisioned by storage class csi-qcfs

apiVersion: v1
kind: PersistentVolumeClaim
metadata:
  name: qcfs-pvc
  namespace: default
....
spec:
  accessModes:
  - ReadWriteOnce
  resources:
    requests:
      storage: 300Gi
  storageClassName: csi-qcfs
  • Create MySQL 5.7 instance to use PVC qcfs-pvc
  • In order to mirror the exact same production-level scenario, there are actually two different types of workloads including:
    • Batch insert to make MySQL consuming more file system capacity
    • Surge query request
  • Dynamically expand volume capacity through edit pvc qcfs-pvc configuration

The Prometheus and Grafana integration allows us to visualize corresponding critical metrics.

prometheus grafana

We notice that the middle reading shows MySQL datafile size increasing slowly during bulk inserting. At the same time, the bottom reading shows file system expanding twice in about 20 minutes, from 300 GiB to 400 GiB and then 500 GiB. Meanwhile, the upper reading shows the whole process of expanding volume immediately completes and hardly impacts MySQL QPS.

Conclusion

Regardless of whatever infrastructure applications have been running on, the database is always a critical resource. It is essential to have a more advanced storage subsystem out there to fully support database requirements. This will help drive the more broad adoption of cloud native technology.

  • Dec 31 / 2018
  • 0
Hi Tech

Blog: Out of the Clouds onto the Ground: How to Make Kubernetes Production Grade Anywhere

Authors: Steven Wong (VMware), Michael Gasch (VMware)

This blog offers some guidelines for running a production grade Kubernetes cluster in an environment like an on-premise data center or edge location.

What does it mean to be “production grade”?

  • The installation is secure
  • The deployment is managed with a repeatable and recorded process
  • Performance is predictable and consistent
  • Updates and configuration changes can be safely applied
  • Logging and monitoring is in place to detect and diagnose failures and resource shortages
  • Service is “highly available enough” considering available resources, including constraints on money, physical space, power, etc.
  • A recovery process is available, documented, and tested for use in the event of failures

In short, production grade means anticipating accidents and preparing for recovery with minimal pain and delay.

This article is directed at on-premise Kubernetes deployments on a hypervisor or bare-metal platform, facing finite backing resources compared to the expansibility of the major public clouds. However, some of these recommendations may also be useful in a public cloud if budget constraints limit the resources you choose to consume.

A single node bare-metal Minikube deployment may be cheap and easy, but is not production grade. Conversely, you’re not likely to achieve Google’s Borg experience in a retail store, branch office, or edge location, nor are you likely to need it.

This blog offers some guidance on achieving a production worthy Kubernetes deployment, even when dealing with some resource constraints.

without incidence

Critical components in a Kubernetes cluster

Before we dive into the details, it is critical to understand the overall Kubernetes architecture.

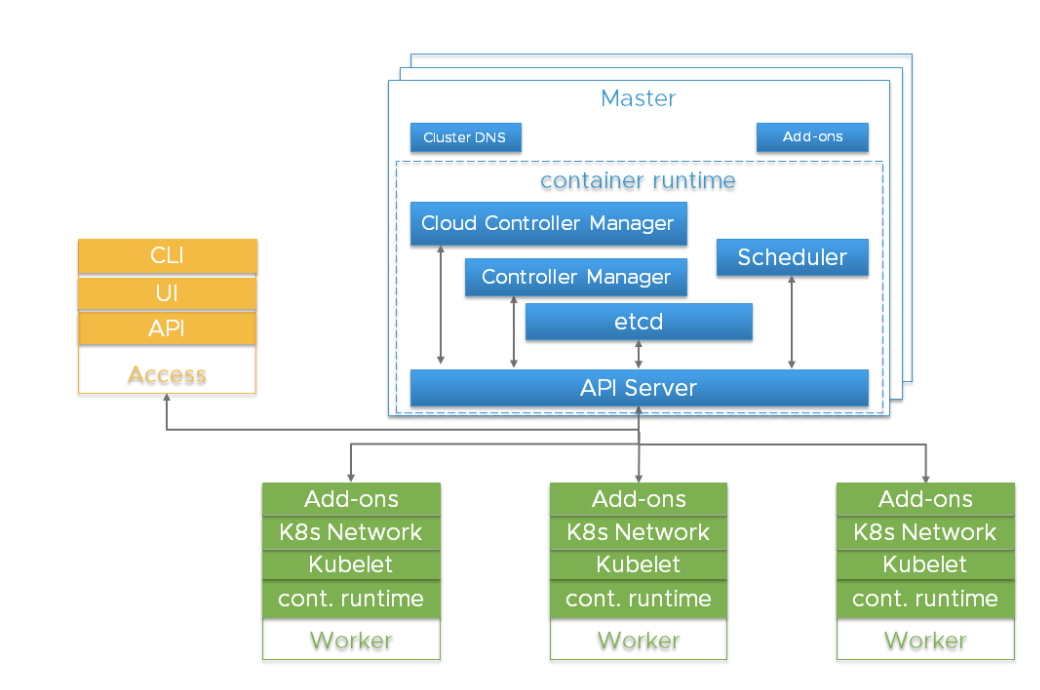
A Kubernetes cluster is a highly distributed system based on a control plane and clustered worker node architecture as depicted below.
api server

Typically the API server, Controller Manager and Scheduler components are co-located within multiple instances of control plane (aka Master) nodes. Master nodes usually include etcd too, although there are high availability and large cluster scenarios that call for running etcd on independent hosts. The components can be run as containers, and optionally be supervised by Kubernetes, i.e. running as statics pods.

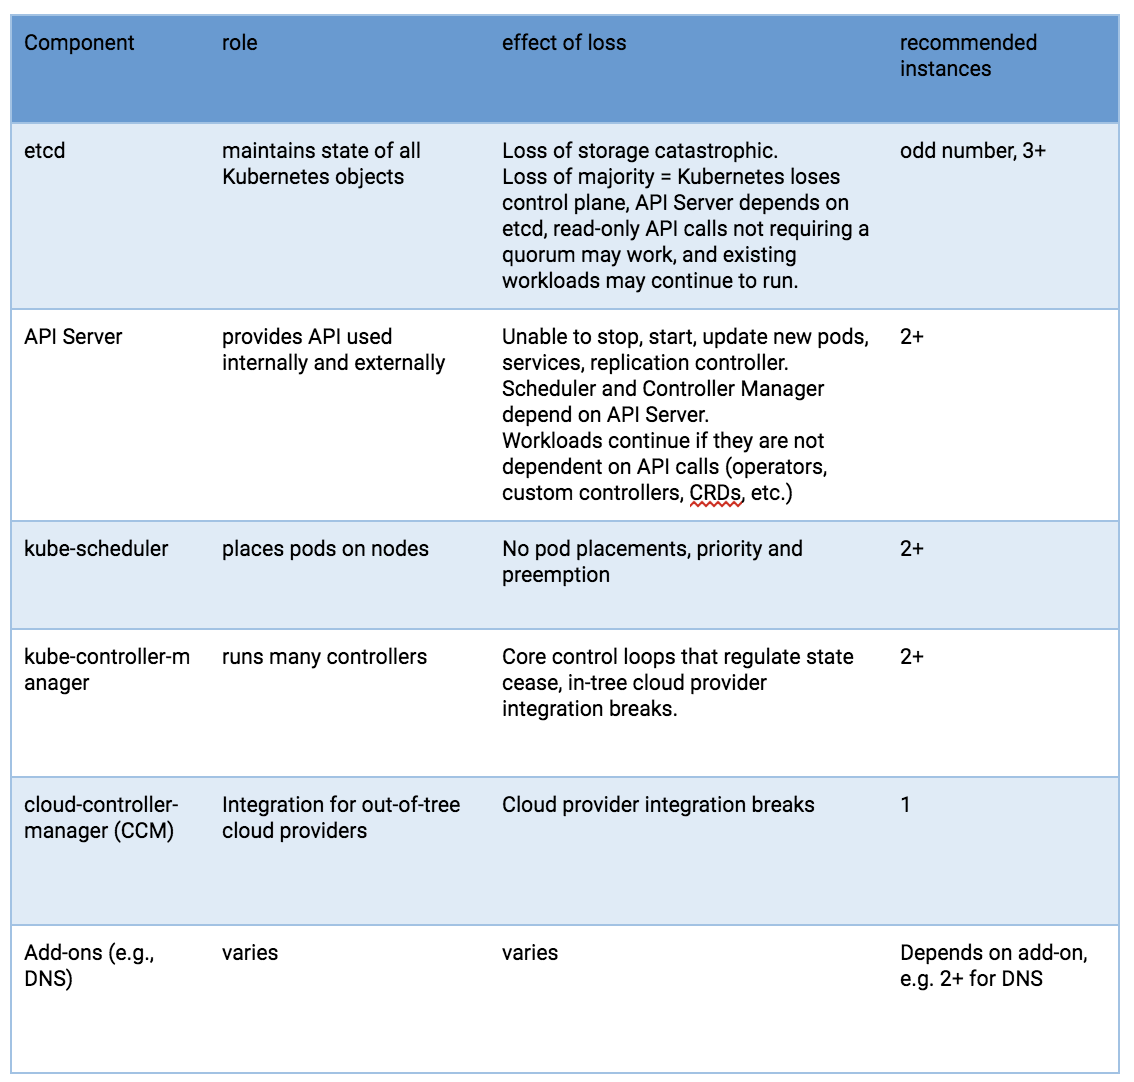
For high availability, redundant instances of these components are used. The importance and required degree of redundancy varies.

Kubernetes components from an HA perspective
kubernetes components HA

Risks to these components include hardware failures, software bugs, bad updates, human errors, network outages, and overloaded systems resulting in resource exhaustion. Redundancy can mitigate the impact of many of these hazards. In addition, the resource scheduling and high availability features of a hypervisor platform can be useful to surpass what can be achieved using the Linux operating system, Kubernetes, and a container runtime alone.

The API Server uses multiple instances behind a load balancer to achieve scale and availability. The load balancer is a critical component for purposes of high availability. Multiple DNS API Server ‘A’ records might be an alternative if you don’t have a load balancer.

The kube-scheduler and kube-controller-manager engage in a leader election process, rather than utilizing a load balancer. Since a cloud-controller-manager is used for selected types of hosting infrastructure, and these have implementation variations, they will not be discussed, beyond indicating that they are a control plane component.

Pods running on Kubernetes worker nodes are managed by the kubelet agent. Each worker instance runs the kubelet agent and a CRI-compatible container runtime. Kubernetes itself is designed to monitor and recover from worker node outages. But for critical workloads, hypervisor resource management, workload isolation and availability features can be used to enhance availability and make performance more predictable.

etcd

etcd is the persistent store for all Kubernetes objects. The availability and recoverability of the etcd cluster should be the first consideration in a production-grade Kubernetes deployment.

A five-node etcd cluster is a best practice if you can afford it. Why? Because you could engage in maintenance on one and still tolerate a failure. A three-node cluster is the minimum recommendation for production-grade service, even if only a single hypervisor host is available. More than seven nodes is not recommended except for very large installations straddling multiple availability zones.

The minimum recommendation for hosting an etcd cluster node is 2GB of RAM with 8GB of SSD-backed disk. Usually, 8GB RAM and a 20GB disk will be enough. Disk performance affects failed node recovery time. See https://coreos.com/etcd/docs/latest/op-guide/hardware.html for more on this.

Consider multiple etcd clusters in special situations

For very large Kubernetes clusters, consider using a separate etcd cluster for Kubernetes events so that event storms do not impact the main Kubernetes API service. If you use flannel networking, it retains configuration in etcd and may have differing version requirements than Kubernetes, which can complicate etcd backup – consider using a dedicated etcd cluster for flannel.

Single host deployments

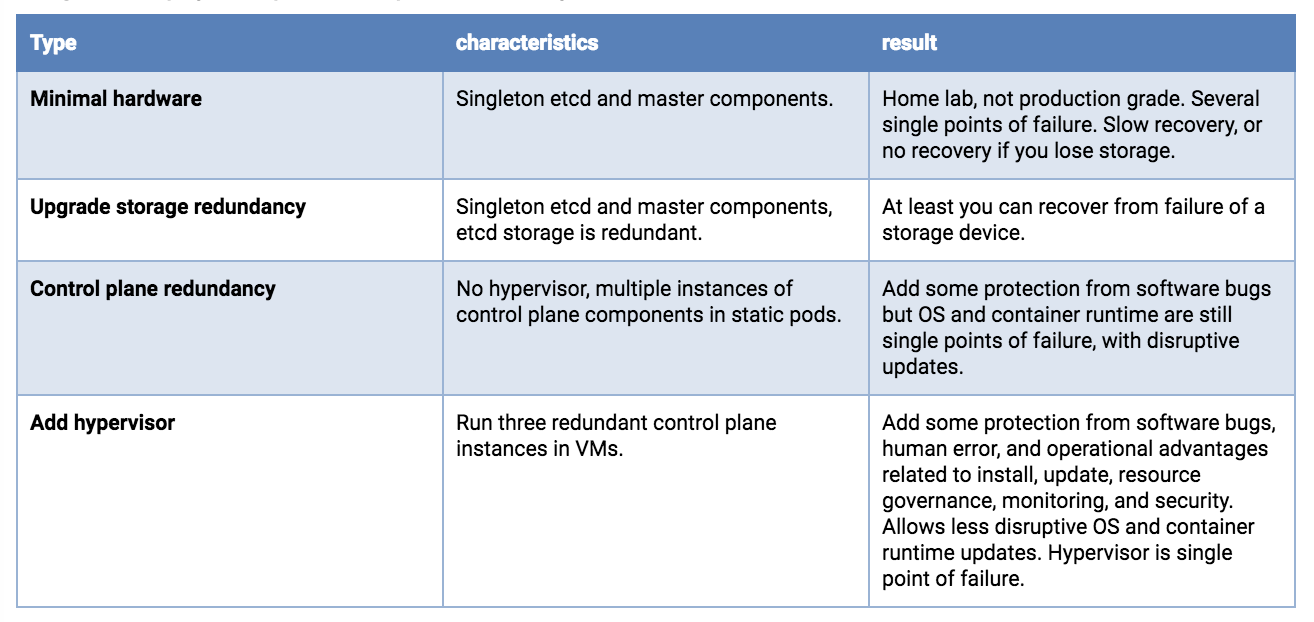
The availability risk list includes hardware, software and people. If you are limited to a single host, the use of redundant storage, error-correcting memory and dual power supplies can reduce hardware failure exposure. Running a hypervisor on the physical host will allow operation of redundant software components and add operational advantages related to deployment, upgrade, and resource consumption governance, with predictable and repeatable performance under stress. For example, even if you can only afford to run singletons of the master services, they need to be protected from overload and resource exhaustion while competing with your application workload. A hypervisor can be more effective and easier to manage than configuring Linux scheduler priorities, cgroups, Kubernetes flags, etc.

If resources on the host permit, you can deploy three etcd VMs. Each of the etcd VMs should be backed by a different physical storage device, or they should use separate partitions of a backing store using redundancy (mirroring, RAID, etc).

Dual redundant instances of the API server, scheduler and controller manager would be the next upgrade, if your single host has the resources.

Single host deployment options, least production worthy to better
single host deployment

Dual host deployments

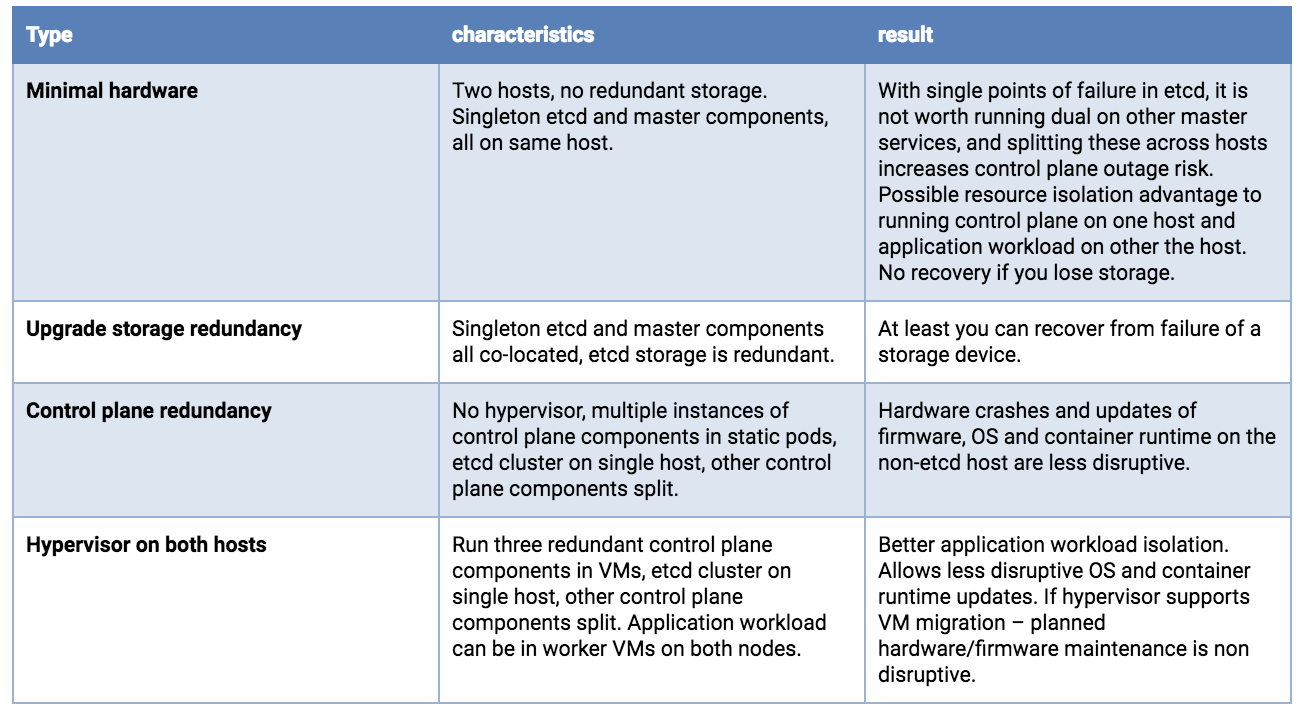
With two hosts, storage concerns for etcd are the same as a single host, you want redundancy. And you would preferably run 3 etcd instances. Although possibly counter-intuitive, it is better to concentrate all etcd nodes on a single host. You do not gain reliability by doing a 2+1 split across two hosts – because loss of the node holding the majority of etcd instances results in an outage, whether that majority is 2 or 3. If the hosts are not identical, put the whole etcd cluster on the most reliable host.

Running redundant API Servers, kube-schedulers, and kube-controller-managers is recommended. These should be split across hosts to minimize risk due to container runtime, OS and hardware failures.

Running a hypervisor layer on the physical hosts will allow operation of redundant software components with resource consumption governance, and can have planned maintenance operational advantages.

Dual host deployment options, least production worthy to better
dual host deployment

Triple (or larger) host deployments – Moving into uncompromised production-grade service
Splitting etcd across three hosts is recommended. A single hardware failure will reduce application workload capacity, but should not result in a complete service outage.

With very large clusters, more etcd instances will be required.

Running a hypervisor layer offers operational advantages and better workload isolation. It is beyond the scope of this article, but at the three-or-more host level, advanced features may be available (clustered redundant shared storage, resource governance with dynamic load balancing, automated health monitoring with live migration or failover).

Triple (or more) host options, least production worthy to better

triple host deployment

Kubernetes configuration settings

Master and Worker nodes should be protected from overload and resource exhaustion. Hypervisor features can be used to isolate critical components and reserve resources. There are also Kubernetes configuration settings that can throttle things like API call rates and pods per node. Some install suites and commercial distributions take care of this, but if you are performing a custom Kubernetes deployment, you may find that the defaults are not appropriate, particularly if your resources are small or your cluster is large.

Resource consumption by the control plane will correlate with the number of pods and the pod churn rate. Very large and very small clusters will benefit from non-default settings of kube-apiserver request throttling and memory. Having these too high can lead to request limit exceeded and out of memory errors.

On worker nodes, Node Allocatable should be configured based on a reasonable supportable workload density at each node. Namespaces can be created to subdivide the worker node cluster into multiple virtual clusters with resource CPU and memory quotas. Kubelet handling of out of resource conditions can be configured.

Security

Every Kubernetes cluster has a cluster root Certificate Authority (CA). The Controller Manager, API Server, Scheduler, kubelet client, kube-proxy and administrator certificates need to be generated and installed. If you use an install tool or a distribution this may be handled for you. A manual process is described here. You should be prepared to reinstall certificates in the event of node replacements or expansions.

As Kubernetes is entirely API driven, controlling and limiting who can access the cluster and what actions they are allowed to perform is essential. Encryption and authentication options are addressed in this documentation.

Kubernetes application workloads are based on container images. You want the source and content of these images to be trustworthy. This will almost always mean that you will host a local container image repository. Pulling images from the public Internet can present both reliability and security issues. You should choose a repository that supports image signing, security scanning, access controls on pushing and pulling images, and logging of activity.

Processes must be in place to support applying updates for host firmware, hypervisor, OS, Kubernetes, and other dependencies. Version monitoring should be in place to support audits.

Recommendations:

  • Tighten security settings on the control plane components beyond defaults (e.g., locking down worker nodes)
  • Utilize Pod Security Policies
  • Consider the NetworkPolicy integration available with your networking solution, including how you will accomplish tracing, monitoring and troubleshooting.
  • Use RBAC to drive authorization decisions and enforcement.
  • Consider physical security, especially when deploying to edge or remote office locations that may be unattended. Include storage encryption to limit exposure from stolen devices and protection from attachment of malicious devices like USB keys.
  • Protect Kubernetes plain-text cloud provider credentials (access keys, tokens, passwords, etc.)

Kubernetes secret objects are appropriate for holding small amounts of sensitive data. These are retained within etcd. These can be readily used to hold credentials for the Kubernetes API but there are times when a workload or an extension of the cluster itself needs a more full-featured solution. The HashiCorp Vault project is a popular solution if you need more than the built-in secret objects can provide.

Disaster Recovery and Backup

disaster recovery

Utilizing redundancy through the use of multiple hosts and VMs helps reduce some classes of outages, but scenarios such as a sitewide natural disaster, a bad update, getting hacked, software bugs, or human error could still result in an outage.

A critical part of a production deployment is anticipating a possible future recovery.

It’s also worth noting that some of your investments in designing, documenting, and automating a recovery process might also be re-usable if you need to do large-scale replicated deployments at multiple sites.

Elements of a DR plan include backups (and possibly replicas), replacements, a planned process, people who can carry out the process, and recurring training. Regular test exercises and chaos engineering principles can be used to audit your readiness.

Your availability requirements might demand that you retain local copies of the OS, Kubernetes components, and container images to allow recovery even during an Internet outage. The ability to deploy replacement hosts and nodes in an “air-gapped” scenario can also offer security and speed of deployment advantages.

All Kubernetes objects are stored on etcd. Periodically backing up the etcd cluster data is important to recover Kubernetes clusters under disaster scenarios, such as losing all master nodes.

Backing up an etcd cluster can be accomplished with etcd’s built-in snapshot mechanism, and copying the resulting file to storage in a different failure domain. The snapshot file contains all the Kubernetes states and critical information. In order to keep the sensitive Kubernetes data safe, encrypt the snapshot files.

Using disk volume based snapshot recovery of etcd can have issues; see #40027. API-based backup solutions (e.g., Ark) can offer more granular recovery than a etcd snapshot, but also can be slower. You could utilize both snapshot and API-based backups, but you should do one form of etcd backup as a minimum.

Be aware that some Kubernetes extensions may maintain state in independent etcd clusters, on persistent volumes, or through other mechanisms. If this state is critical, it should have a backup and recovery plan.

Some critical state is held outside etcd. Certificates, container images, and other configuration- and operation-related state may be managed by your automated install/update tooling. Even if these items can be regenerated, backup or replication might allow for faster recovery after a failure. Consider backups with a recovery plan for these items:

  • Certificate and key pairs
    • CA
    • API Server
    • Apiserver-kubelet-client
    • ServiceAccount signing
    • “Front proxy”
    • Front proxy client
  • Critical DNS records
  • IP/subnet assignments and reservations
  • External load-balancers
  • kubeconfig files
  • LDAP or other authentication details
  • Cloud provider specific account and configuration data

Considerations for your production workloads

Anti-affinity specifications can be used to split clustered services across backing hosts, but at this time the settings are used only when the pod is scheduled. This means that Kubernetes can restart a failed node of your clustered application, but does not have a native mechanism to rebalance after a fail back. This is a topic worthy of a separate blog, but supplemental logic might be useful to achieve optimal workload placements after host or worker node recoveries or expansions. The Pod Priority and Preemption feature can be used to specify a preferred triage in the event of resource shortages caused by failures or bursting workloads.

For stateful services, external attached volume mounts are the standard Kubernetes recommendation for a non-clustered service (e.g., a typical SQL database). At this time Kubernetes managed snapshots of these external volumes is in the category of a roadmap feature request, likely to align with the Container Storage Interface (CSI) integration. Thus performing backups of such a service would involve application specific, in-pod activity that is beyond the scope of this document. While awaiting better Kubernetes support for a snapshot and backup workflow, running your database service in a VM rather than a container, and exposing it to your Kubernetes workload may be worth considering.

Cluster-distributed stateful services (e.g., Cassandra) can benefit from splitting across hosts, using local persistent volumes if resources allow. This would require deploying multiple Kubernetes worker nodes (could be VMs on hypervisor hosts) to preserve a quorum under single point failures.

Other considerations

Logs and metrics (if collected and persistently retained) are valuable to diagnose outages, but given the variety of technologies available it will not be addressed in this blog. If Internet connectivity is available, it may be desirable to retain logs and metrics externally at a central location.

Your production deployment should utilize an automated installation, configuration and update tool (e.g., Ansible, BOSH, Chef, Juju, kubeadm, Puppet, etc.). A manual process will have repeatability issues, be labor intensive, error prone, and difficult to scale. Certified distributions are likely to include a facility for retaining configuration settings across updates, but if you implement your own install and config toolchain, then retention, backup and recovery of the configuration artifacts is essential. Consider keeping your deployment components and settings under a version control system such as Git.

Outage recovery

Runbooks documenting recovery procedures should be tested and retained offline – perhaps even printed. When an on-call staff member is called up at 2 am on a Friday night, it may not be a great time to improvise. Better to execute from a pre-planned, tested checklist – with shared access by remote and onsite personnel.

Final thoughts

airplane

Buying a ticket on a commercial airline is convenient and safe. But when you travel to a remote location with a short runway, that commercial Airbus A320 flight isn’t an option. This doesn’t mean that air travel is off the table. It does mean that some compromises are necessary.

The adage in aviation is that on a single engine aircraft, an engine failure means you crash. With twin engines, at the very least, you get more choices of where you crash. Kubernetes on a small number of hosts is similar, and if your business case justifies it, you might scale up to a larger fleet of mixed large and small vehicles (e.g., FedEx, Amazon).

Those designing a production-grade Kubernetes solution have a lot of options and decisions. A blog-length article can’t provide all the answers, and can’t know your specific priorities. We do hope this offers a checklist of things to consider, along with some useful guidance. Some options were left “on the cutting room floor” (e.g., running Kubernetes components using self-hosting instead of static pods). These might be covered in a follow up if there is interest. Also, Kubernetes’ high enhancement rate means that if your search engine found this article after 2019, some content might be past the “sell by” date.

  • Dec 31 / 2018
  • 0
Hi Tech

Blog: Introducing Kubebuilder: an SDK for building Kubernetes APIs using CRDs

Author: Phillip Wittrock (Google), Sunil Arora (Google)

How can we enable applications such as MySQL, Spark and Cassandra to manage themselves just like Kubernetes Deployments and Pods do? How do we configure these applications as their own first class APIs instead of a collection of StatefulSets, Services, and ConfigMaps?

We have been working on a solution and are happy to introduce kubebuilder, a comprehensive development kit for rapidly building and publishing Kubernetes APIs and Controllers using CRDs. Kubebuilder scaffolds projects and API definitions and is built on top of the controller-runtime libraries.

Why Kubebuilder and Kubernetes APIs?

Applications and cluster resources typically require some operational work – whether it is replacing failed replicas with new ones, or scaling replica counts while resharding data. Running the MySQL application may require scheduling backups, reconfiguring replicas after scaling, setting up failure detection and remediation, etc.

With the Kubernetes API model, management logic is embedded directly into an application specific Kubernetes API, e.g. a “MySQL” API. Users then declaratively manage the application through YAML configuration using tools such as kubectl, just like they do for Kubernetes objects. This approach is referred to as an Application Controller, also known as an Operator. Controllers are a powerful technique backing the core Kubernetes APIs that may be used to build many kinds of solutions in addition to Applications; such as Autoscalers, Workload APIs, Configuration APIs, CI/CD systems, and more.

However, while it has been possible for trailblazers to build new Controllers on top of the raw API machinery, doing so has been a DIY “from scratch” experience, requiring developers to learn low level details about how Kubernetes libraries are implemented, handwrite boilerplate code, and wrap their own solutions for integration testing, RBAC configuration, documentation, etc. Kubebuilder makes this experience simple and easy by applying the lessons learned from building the core Kubernetes APIs.

Getting Started Building Application Controllers and Kubernetes APIs

By providing an opinionated and structured solution for creating Controllers and Kubernetes APIs, developers have a working “out of the box” experience that uses the lessons and best practices learned from developing the core Kubernetes APIs. Creating a new “Hello World” Controller with kubebuilder is as simple as:

  1. Create a project with kubebuilder init
  2. Define a new API with kubebuilder create api
  3. Build and run the provided main function with make install & make run

This will scaffold the API and Controller for users to modify, as well as scaffold integration tests, RBAC rules, Dockerfiles, Makefiles, etc.
After adding their implementation to the project, users create the artifacts to publish their API through:

  1. Build and push the container image from the provided Dockerfile using make docker-build and make docker-push commands
  2. Deploy the API using make deploy command

Whether you are already a Controller aficionado or just want to learn what the buzz is about, check out the kubebuilder repo or take a look at an example in the kubebuilder book to learn about how simple and easy it is to build Controllers.

Get Involved

Kubebuilder is a project under SIG API Machinery and is being actively developed by contributors from many companies such as Google, Red Hat, VMware, Huawei and others. Get involved by giving us feedback through these channels:

  • Dec 31 / 2018
  • 0
Hi Tech

Blog: The Machines Can Do the Work, a Story of Kubernetes Testing, CI, and Automating the Contributor Experience

Author: Aaron Crickenberger (Google) and Benjamin Elder (Google)

“Large projects have a lot of less exciting, yet, hard work. We value time spent automating repetitive work more highly than toil. Where that work cannot be automated, it is our culture to recognize and reward all types of contributions. However, heroism is not sustainable.”Kubernetes Community Values

Like many open source projects, Kubernetes is hosted on GitHub. We felt the barrier to participation would be lowest if the project lived where developers already worked, using tools and processes developers already knew. Thus the project embraced the service fully: it was the basis of our workflow, our issue tracker, our documentation, our blog platform, our team structure, and more.

This strategy worked. It worked so well that the project quickly scaled past its contributors’ capacity as humans. What followed was an incredible journey of automation and innovation. We didn’t just need to rebuild our airplane mid-flight without crashing, we needed to convert it into a rocketship and launch into orbit. We needed machines to do the work.

The Work

Initially, we focused on the fact that we needed to support the sheer volume of tests mandated by a complex distributed system such as Kubernetes. Real world failure scenarios had to be exercised via end-to-end (e2e) tests to ensure proper functionality. Unfortunately, e2e tests were susceptible to flakes (random failures) and took anywhere from an hour to a day to complete.

Further experience revealed other areas where machines could do the work for us:

  • PR Workflow
    • Did the contributor sign our CLA?
    • Did the PR pass tests?
    • Is the PR mergeable?
    • Did the merge commit pass tests?
  • Triage
    • Who should be reviewing PRs?
    • Is there enough information to route an issue to the right people?
    • Is an issue still relevant?
  • Project Health
    • What is happening in the project?
    • What should we be paying attention to?

As we developed automation to improve our situation, we followed a few guiding principles:

  • Follow the push/poll control loop patterns that worked well for Kubernetes
  • Prefer stateless loosely coupled services that do one thing well
  • Prefer empowering the entire community over empowering a few core contributors
  • Eat our own dogfood and avoid reinventing wheels

Enter Prow

This led us to create Prow as the central component for our automation. Prow is sort of like an If This, Then That for GitHub events, with a built-in library of commands, plugins, and utilities. We built Prow on top of Kubernetes to free ourselves from worrying about resource management and scheduling, and ensure a more pleasant operational experience.

Prow lets us do things like:

  • Allow our community to triage issues/PRs by commenting commands such as “/priority critical-urgent”, “/assign mary” or “/close”
  • Auto-label PRs based on how much code they change, or which files they touch
  • Age out issues/PRs that have remained inactive for too long
  • Auto-merge PRs that meet our PR workflow requirements
  • Run CI jobs defined as Knative Builds, Kubernetes Pods, or Jenkins jobs
  • Enforce org-wide and per-repo GitHub policies like branch protection and GitHub labels

Prow was initially developed by the engineering productivity team building Google Kubernetes Engine, and is actively contributed to by multiple members of Kubernetes SIG Testing. Prow has been adopted by several other open source projects, including Istio, JetStack, Knative and OpenShift. Getting started with Prow takes a Kubernetes cluster and kubectl apply starter.yaml (running pods on a Kubernetes cluster).

Once we had Prow in place, we began to hit other scaling bottlenecks, and so produced additional tooling to support testing at the scale required by Kubernetes, including:

  • Boskos: manages job resources (such as GCP projects) in pools, checking them out for jobs and cleaning them up automatically (with monitoring)
  • ghProxy: a reverse proxy HTTP cache optimized for use with the GitHub API, to ensure our token usage doesn’t hit API limits (with monitoring)
  • Greenhouse: allows us to use a remote bazel cache to provide faster build and test results for PRs (with monitoring)
  • Splice: allows us to test and merge PRs in a batch, ensuring our merge velocity is not limited to our test velocity
  • Tide: allows us to merge PRs selected via GitHub queries rather than ordered in a queue, allowing for significantly higher merge velocity in tandem with splice

Scaling Project Health

With workflow automation addressed, we turned our attention to project health. We chose to use Google Cloud Storage (GCS) as our source of truth for all test data, allowing us to lean on established infrastructure, and allowed the community to contribute results. We then built a variety of tools to help individuals and the project as a whole make sense of this data, including:

  • Gubernator: display the results and test history for a given PR
  • Kettle: transfer data from GCS to a publicly accessible bigquery dataset
  • PR dashboard: a workflow-aware dashboard that allows contributors to understand which PRs require attention and why
  • Triage: identify common failures that happen across all jobs and tests
  • Testgrid: display test results for a given job across all runs, summarize test results across groups of jobs

We approached the Cloud Native Computing Foundation (CNCF) to develop DevStats to glean insights from our GitHub events such as:

Into the Beyond

Today, the Kubernetes project spans over 125 repos across five orgs. There are 31 Special Interests Groups and 10 Working Groups coordinating development within the project. In the last year the project has had participation from over 13,800 unique developers on GitHub.

On any given weekday our Prow instance runs over 10,000 CI jobs; from March 2017 to March 2018 it ran 4.3 million jobs. Most of these jobs involve standing up an entire Kubernetes cluster, and exercising it using real world scenarios. They allow us to ensure all supported releases of Kubernetes work across cloud providers, container engines, and networking plugins. They make sure the latest releases of Kubernetes work with various optional features enabled, upgrade safely, meet performance requirements, and work across architectures.

With today’s announcement from CNCF – noting that Google Cloud has begun transferring ownership and management of the Kubernetes project’s cloud resources to CNCF community contributors, we are excited to embark on another journey. One that allows the project infrastructure to be owned and operated by the community of contributors, following the same open governance model that has worked for the rest of the project. Sound exciting to you? Come talk to us at #sig-testing on kubernetes.slack.com.

Want to find out more? Come check out these resources:

  • Dec 31 / 2018
  • 0
Hi Tech

Blog: 2018 Steering Committee Election Cycle Kicks Off

Author: Paris Pittman (Google), Jorge Castro (Heptio), Ihor Dvoretskyi (CNCF)

Having a clear, definable governance model is crucial for the health of open source projects. For one of the highest velocity projects in the open source world, governance is critical especially for one as large and active as Kubernetes, which is one of the most high-velocity projects in the open source world. A clear structure helps users trust that the project will be nurtured and progress forward. Initially, this structure was laid by the former 7 member bootstrap committee composed of founders and senior contributors with a goal to create the foundational governance building blocks.

The initial charter and establishment of an election process to seat a full Steering Committee was a part of those first building blocks. Last year, the bootstrap committee kicked off the first Kubernetes Steering Committee election which brought forth 6 new members from the community as voted on by contributors. These new members plus the bootstrap committee formed the Steering Committee that we know today. This yearly election cycle will continue to ensure that new representatives get cycled through to add different voices and thoughts on the Kubernetes project strategy.

The committee has worked hard on topics that will streamline the project and how we operate. SIG (Special Interest Group) governance was an overarching recurring theme this year: Kubernetes community is not a monolithic organization, but a huge, distributed community, where Special Interest Groups (SIGs) and Working Groups (WGs) are the atomic community units, that are making Kubernetes so successful from the ground.

Contributors – this is where you come in.

There are three seats up for election this year. The voters guide will get you up to speed on the specifics of this years election including candidate bios as they are updated in real time. The elections process doc will steer you towards eligibility, operations, and the fine print.

1) Nominate yourself, someone else, and/or put your support to others.

Want to help chart our course? Interested in governance and community topics? Add your name! The nomination process is optional.

2) Vote.

On September 19th, eligible voters will receive an email poll invite conducted by CIVS. The newly elected will be announced at the weekly community meeting on Thursday, October 4th at 5pm UTC.

To those who are running:

Helpful resources

  • Steering Committee – who sits on the committee and terms, their projects and meetings info
  • Steering Committee Charter – this is a great read if you’re interested in running (or assessing for the best candidates!)
  • Election Process
  • Voters Guide! – Updated on a rolling basis. This guide will always have the latest information throughout the election cycle. The complete schedule of events and candidate bios will be housed here.
  • Dec 31 / 2018
  • 0
Hi Tech

Blog: Hands On With Linkerd 2.0

Author: Thomas Rampelberg (Buoyant)

Linkerd 2.0 was recently announced as generally available (GA), signaling its readiness for production use. In this tutorial, we’ll walk you through how to get Linkerd 2.0 up and running on your Kubernetes cluster in a matter seconds.

But first, what is Linkerd and why should you care? Linkerd is a service sidecar that augments a Kubernetes service, providing zero-config dashboards and UNIX-style CLI tools for runtime debugging, diagnostics, and reliability. Linkerd is also a service mesh, applied to multiple (or all) services in a cluster to provide a uniform layer of telemetry, security, and control across them.

Linkerd works by installing ultralight proxies into each pod of a service. These proxies report telemetry data to, and receive signals from, a control plane. This means that using Linkerd doesn’t require any code changes, and can even be installed live on a running service. Linkerd is fully open source, Apache v2 licensed, and is hosted by the Cloud Native Computing Foundation (just like Kubernetes itself!)

Without further ado, let’s see just how quickly you can get Linkerd running on your Kubernetes cluster. In this tutorial, we’ll walk you through how to deploy Linkerd on any Kubernetes 1.9+ cluster and how to use it to debug failures in a sample gRPC application.

Step 1: Install the demo app ?

Before we install Linkerd, let’s start by installing a basic gRPC demo application called Emojivoto onto your Kubernetes cluster. To install Emojivoto, run:

curl https://run.linkerd.io/emojivoto.yml | kubectl apply -f -

This command downloads the Kubernetes manifest for Emojivoto, and uses kubectl to apply it to your Kubernetes cluster. Emojivoto is comprised of several services that run in the “emojivoto” namespace. You can see the services by running:

kubectl get -n emojivoto deployments

You can also see the app live by running

minikube -n emojivoto service web-svc --url # if you’re on minikube

… or:

kubectl get svc web-svc -n emojivoto -o jsonpath="{.status.loadBalancer.ingress[0].*}" #

… if you’re somewhere else

Click around. You might notice that some parts of the application are broken! If you were to inspect your handly local Kubernetes dashboard, you wouldn’t see very much interesting—as far as Kubernetes is concerned, the app is running just fine. This is a very common situation! Kubernetes understands whether your pods are running, but not whether they are responding properly.

In the next few steps, we’ll walk you through how to use Linkerd to diagnose the problem.

Step 2: Install Linkerd’s CLI

We’ll start by installing Linkerd’s command-line interface (CLI) onto your local machine. Visit the Linkerd releases page, or simply run:

curl -sL https://run.linkerd.io/install | sh

Once installed, add the linkerd command to your path with:

export PATH=$PATH:$HOME/.linkerd2/bin

You should now be able to run the command linkerd version, which should display:

Client version: v2.0
Server version: unavailable

“Server version: unavailable” means that we need to add Linkerd’s control plane to the cluster, which we’ll do next. But first, let’s validate that your cluster is prepared for Linkerd by running:

linkerd check --pre

This handy command will report any problems that will interfere with your ability to install Linkerd. Hopefully everything looks OK and you’re ready to move on to the next step.

Step 3: Install Linkerd’s control plane onto the cluster

In this step, we’ll install Linkerd’s lightweight control plane into its own namespace (“linkerd”) on your cluster. To do this, run:

linkerd install | kubectl apply -f -

This command generates a Kubernetes manifest and uses kubectl command to apply it to your Kubernetes cluster. (Feel free to inspect the manifest before you apply it.)

(Note: if your Kubernetes cluster is on GKE with RBAC enabled, you’ll need an extra step: you must grant a ClusterRole of cluster-admin to your Google Cloud account first, in order to install certain telemetry features in the control plane. To do that, run: kubectl create clusterrolebinding cluster-admin-binding-$USER --clusterrole=cluster-admin --user=$(gcloud config get-value account).)

Depending on the speed of your internet connection, it may take a minute or two for your Kubernetes cluster to pull the Linkerd images. While that’s happening, we can validate that everything’s happening correctly by running:

linkerd check

This command will patiently wait until Linkerd has been installed and is running.

Finally, we’re ready to view Linkerd’s dashboard! Just run:

linkerd dashboard

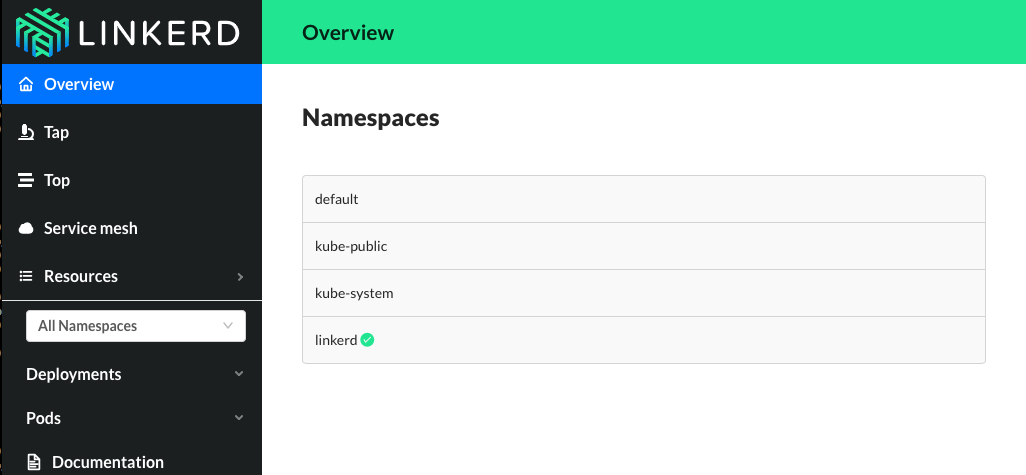
If you see something like below, Linkerd is now running on your cluster. ?

Step 4: Add Linkerd to the web service

At this point we have the Linkerd control plane installed in the “linkerd” namespace, and we have our emojivoto demo app installed in the “emojivoto” namespace. But we haven’t actually added Linkerd to our service yet. So let’s do that.

In this example, let’s pretend we are the owners of the “web” service. Other services, like “emoji” and “voting”, are owned by other teams–so we don’t want to touch them.

There are a couple ways to add Linkerd to our service. For demo purposes, the easiest is to do something like this:

kubectl get -n emojivoto deploy/web -o yaml | linkerd inject - | kubectl apply -f -

This command retrieves the manifest of the “web” service from Kubernetes, runs this manifest through linkerd inject, and finally reapplies it to the Kubernetes cluster. The linkerd inject command augments the manifest to include Linkerd’s data plane proxies. As with linkerd install, linkerd inject is a pure text operation, meaning that you can inspect the input and output before you use it. Since “web” is a Deployment, Kubernetes is kind enough to slowly roll the service one pod at a time–meaning that “web” can be serving traffic live while we add Linkerd to it!

We now have a service sidecar running on the “web” service!

Step 5: Debugging for Fun and for Profit

Congratulations! You now have a full gRPC application running on your Kubernetes cluster with Linkerd installed on the “web” service. Of course, that application is failing when you use it–so now let’s use Linkerd to track down those errors.

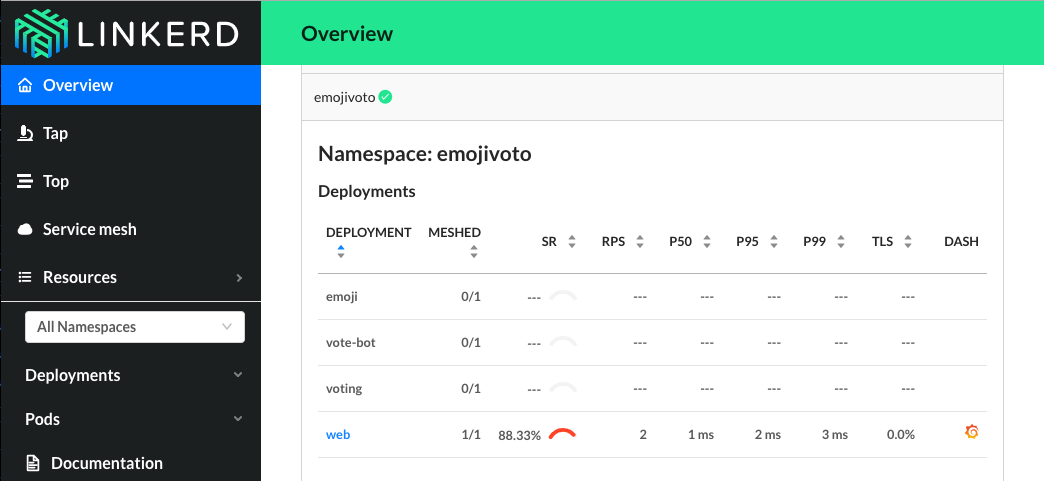
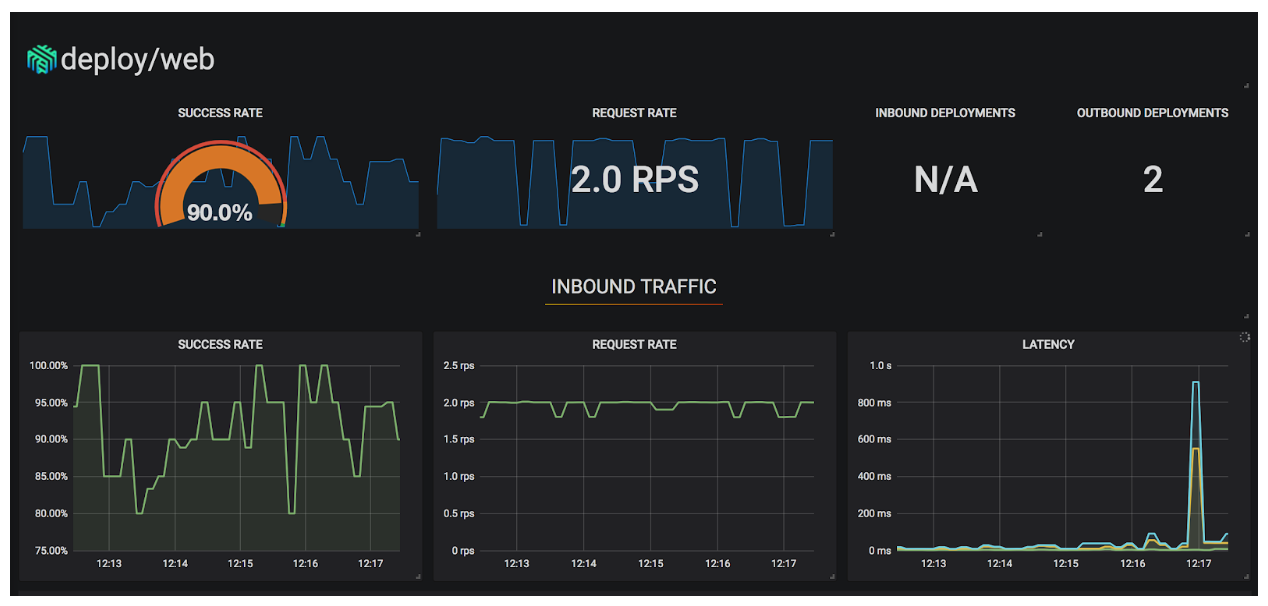
If you glance at the Linkerd dashboard (the linkerd dashboard command), you should see all services in the “emojivoto” namespace show up. Since “web” has the Linkerd service sidecar installed on it, you’ll also see success rate, requests per second, and latency percentiles show up.

That’s pretty neat, but the first thing you might notice is that success rate is well below 100%! Click on “web” and let’s dig in.

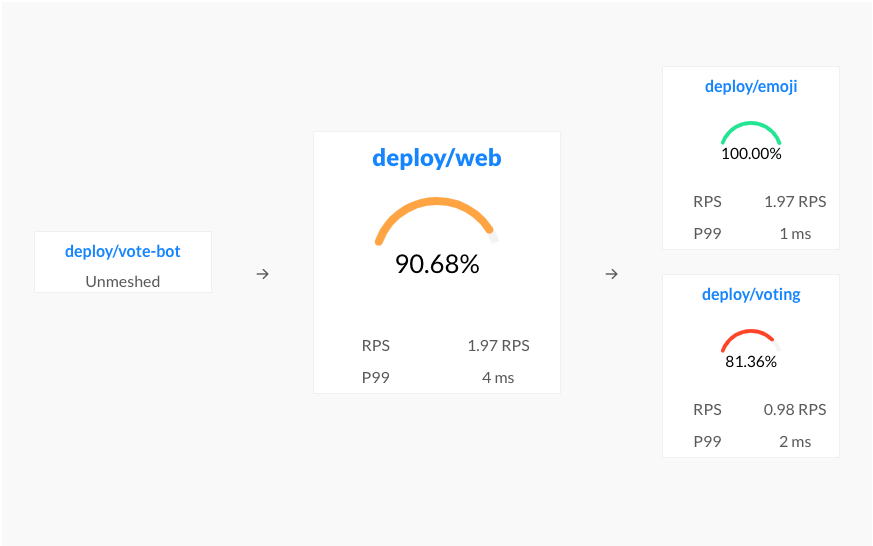
You should now be looking at the Deployment page for the web service. The first thing you’ll see here is that web is taking traffic from vote-bot (a service included in the Emojivoto manifest to continually generate a low level of live traffic), and has two outgoing dependencies, emoji and voting.

The emoji service is operating at 100%, but the voting service is failing! A failure in a dependent service may be exactly what’s causing the errors that web is returning.

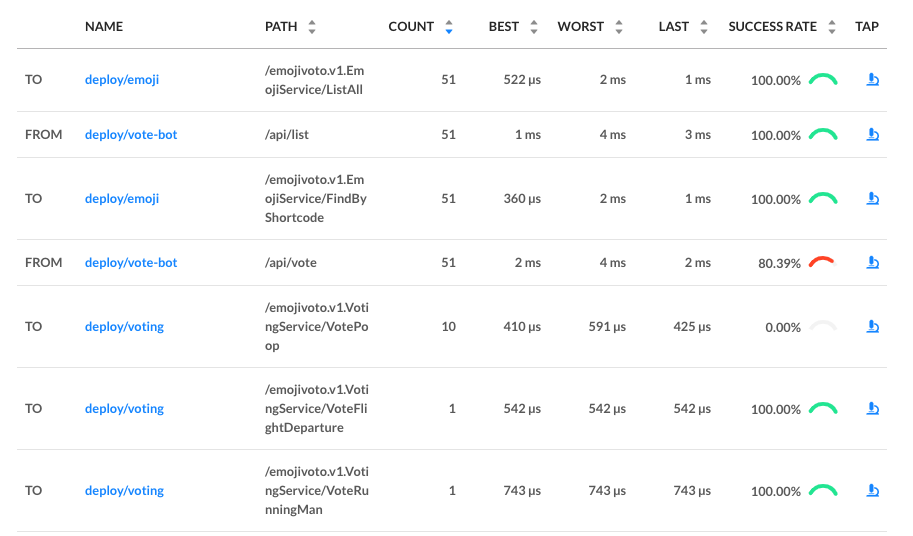
Let’s scroll a little further down the page, we’ll see a live list of all traffic endpoints that “web” is receiving. This is interesting:

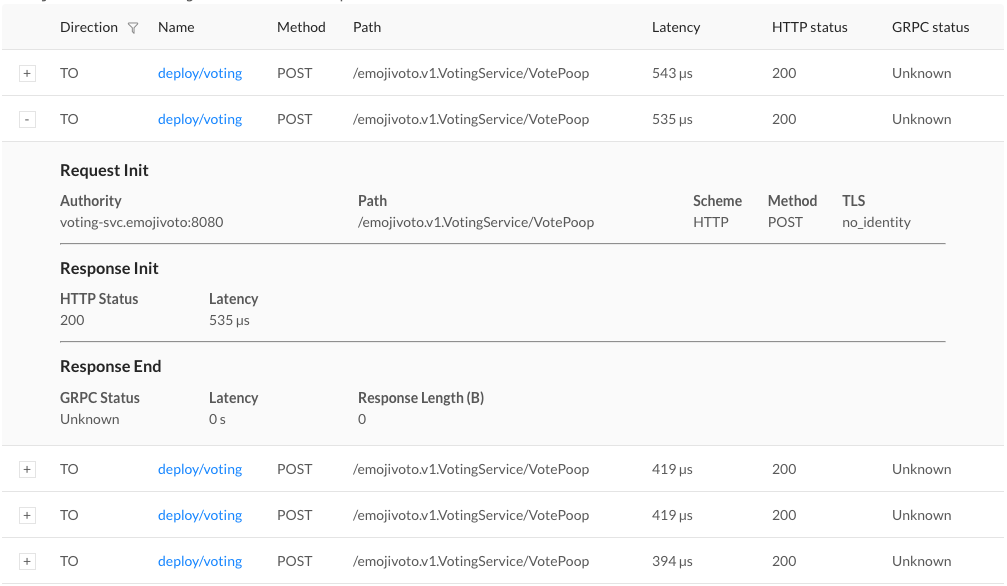
There are two calls that are not at 100%: the first is vote-bot’s call the “/api/vote” endpoint. The second is the “VotePoop” call from the web service to the voting service. Very interesting! Since /api/vote is an incoming call, and “/VotePoop” is an outgoing call, this is a good clue that the failure of the vote service’s VotePoop endpoint is what’s causing the problem!

Finally, if we click on the “tap” icon for that row in the far right column, we’ll be taken to live list of requests that match this endpoint. This allows us to confirm that the requests are failing (they all have gRPC status code 2, indicating an error).

At this point we have the ammunition we need to talk to the owners of the vote “voting” service. We’ve identified an endpoint on their service that consistently returns an error, and have found no other obvious sources of failures in the system.

We hope you’ve enjoyed this journey through Linkerd 2.0. There is much more for you to explore. For example, everything we did above using the web UI can also be accomplished via pure CLI commands, e.g. linkerd top, linkerd stat, and linkerd tap.

Also, did you notice the little Grafana icon on the very first page we looked at? Linkerd ships with automatic Grafana dashboards for all those metrics, allowing you to view everything you’re seeing in the Linkerd dashboard in a time series format. Check it out!

Want more?

In this tutorial, we’ve shown you how to install Linkerd on a cluster, add it as a service sidecar to just one service–while the service is receiving live traffic!—and use it to debug a runtime issue. But this is just the tip of the iceberg. We haven’t even touched any of Linkerd’s reliability or security features!

Linkerd has a thriving community of adopters and contributors, and we’d love for YOU to be a part of it. For more, check out the docs and GitHub repo, join the Linkerd Slack and mailing lists (users, developers, announce), and, of course, follow @linkerd on Twitter! We can’t wait to have you aboard!

  • Dec 31 / 2018
  • 0
Hi Tech

Blog: Kubernetes 1.12: Kubelet TLS Bootstrap and Azure Virtual Machine Scale Sets (VMSS) Move to General Availability

Author: The 1.12 Release Team

We’re pleased to announce the delivery of Kubernetes 1.12, our third release of 2018!

Today’s release continues to focus on internal improvements and graduating features to stable in Kubernetes. This newest version graduates key features such as security and Azure. Notable additions in this release include two highly-anticipated features graduating to general availability: Kubelet TLS Bootstrap and Support for Azure Virtual Machine Scale Sets (VMSS).

These new features mean increased security, availability, resiliency, and ease of use to get production applications to market faster. The release also signifies the increasing maturation and sophistication of Kubernetes on the developer side.

Let’s dive into the key features of this release:

Introducing General Availability of Kubelet TLS Bootstrap

We’re excited to announce General Availability (GA) of Kubelet TLS Bootstrap. In Kubernetes 1.4, we introduced an API for requesting certificates from a cluster-level Certificate Authority (CA). The original intent of this API is to enable provisioning of TLS client certificates for kubelets. This feature allows for a kubelet to bootstrap itself into a TLS-secured cluster. Most importantly, it automates the provision and distribution of signed certificates.

Before, when a kubelet ran for the first time, it had to be given client credentials in an out-of-band process during cluster startup. The burden was on the operator to provision these credentials. Because this task was so onerous to manually execute and complex to automate, many operators deployed clusters with a single credential and single identity for all kubelets. These setups prevented deployment of node lockdown features like the Node authorizer and the NodeRestriction admission controller.

To alleviate this, SIG Auth introduced a way for kubelet to generate a private key and a CSR for submission to a cluster-level certificate signing process. The v1 (GA) designation indicates production hardening and readiness, and comes with the guarantee of long-term backwards compatibility.

Alongside this, Kubelet server certificate bootstrap and rotation is moving to beta. Currently, when a kubelet first starts, it generates a self-signed certificate/key pair that is used for accepting incoming TLS connections. This feature introduces a process for generating a key locally and then issuing a Certificate Signing Request to the cluster API server to get an associated certificate signed by the cluster’s root certificate authority. Also, as certificates approach expiration, the same mechanism will be used to request an updated certificate.

Support for Azure Virtual Machine Scale Sets (VMSS) and Cluster-Autoscaler is Now Stable

Azure Virtual Machine Scale Sets (VMSS) allow you to create and manage a homogenous VM pool that can automatically increase or decrease based on demand or a set schedule. This enables you to easily manage, scale, and load balance multiple VMs to provide high availability and application resiliency, ideal for large-scale applications that can run as Kubernetes workloads.

With this new stable feature, Kubernetes supports the scaling of containerized applications with Azure VMSS, including the ability to integrate it with cluster-autoscaler to automatically adjust the size of the Kubernetes clusters based on the same conditions.

Additional Notable Feature Updates

RuntimeClass is a new cluster-scoped resource that surfaces container runtime properties to the control plane being released as an alpha feature.

Snapshot / restore functionality for Kubernetes and CSI is being introduced as an alpha feature. This provides standardized APIs design (CRDs) and adds PV snapshot/restore support for CSI volume drivers.

Topology aware dynamic provisioning is now in beta, meaning storage resources can now understand where they live. This also includes beta support to AWS EBS and GCE PD.

Configurable pod process namespace sharing is moving to beta, meaning users can configure containers within a pod to share a common PID namespace by setting an option in the PodSpec.

Taint node by condition is now in beta, meaning users have the ability to represent node conditions that block scheduling by using taints.

Arbitrary / Custom Metrics in the Horizontal Pod Autoscaler is moving to a second beta to test some additional feature enhancements. This reworked Horizontal Pod Autoscaler functionality includes support for custom metrics and status conditions.

Improvements that will allow the Horizontal Pod Autoscaler to reach proper size faster are moving to beta.

Vertical Scaling of Pods is now in beta, which makes it possible to vary the resource limits on a pod over its lifetime. In particular, this is valuable for pets (i.e., pods that are very costly to destroy and re-create).

Encryption at rest via KMS is now in beta. This adds multiple encryption providers, including Google Cloud KMS, Azure Key Vault, AWS KMS, and Hashicorp Vault, that will encrypt data as it is stored to etcd.

Availability

Kubernetes 1.12 is available for download on GitHub. To get started with Kubernetes, check out these interactive tutorials. You can also install 1.12 using Kubeadm.

5 Day Features Blog Series

If you’re interested in exploring these features more in depth, check back next week for our 5 Days of Kubernetes series where we’ll highlight detailed walkthroughs of the following features:

  • Day 1 – Kubelet TLS Bootstrap
  • Day 2 – Support for Azure Virtual Machine Scale Sets (VMSS) and Cluster-Autoscaler
  • Day 3 – Snapshots Functionality
  • Day 4 – RuntimeClass
  • Day 5 – Topology Resources

Release team

This release is made possible through the effort of hundreds of individuals who contributed both technical and non-technical content. Special thanks to the release team led by Tim Pepper, Orchestration & Containers Lead, at VMware Open Source Technology Center. The 36 individuals on the release team coordinate many aspects of the release, from documentation to testing, validation, and feature completeness.

As the Kubernetes community has grown, our release process represents an amazing demonstration of collaboration in open source software development. Kubernetes continues to gain new users at a rapid clip. This growth creates a positive feedback cycle where more contributors commit code creating a more vibrant ecosystem. Kubernetes has over 22,000 individual contributors to date and an active community of more than 45,000 people.

Project Velocity

The CNCF has continued refining DevStats, an ambitious project to visualize the myriad contributions that go into the project. K8s DevStats illustrates the breakdown of contributions from major company contributors, as well as an impressive set of preconfigured reports on everything from individual contributors to pull request lifecycle times. On average, 259 different companies and over 1,400 individuals contribute to Kubernetes each month. Check out DevStats to learn more about the overall velocity of the Kubernetes project and community.

User Highlights

Established, global organizations are using Kubernetes in production at massive scale. Recently published user stories from the community include:

Is Kubernetes helping your team? Share your story with the community.

Ecosystem Updates

  • CNCF recently released the findings of their bi-annual CNCF survey, finding that the use of cloud native technologies in production has grown over 200% within the last six months.
  • CNCF expanded its certification offerings to include a Certified Kubernetes Application Developer exam. The CKAD exam certifies an individual’s ability to design, build, configure, and expose cloud native applications for Kubernetes. More information can be found here.
  • CNCF added a new partner category, Kubernetes Training Partners (KTP). KTPs are a tier of vetted training providers who have deep experience in cloud native technology training. View partners and learn more here.
  • CNCF also offers online training that teaches the skills needed to create and configure a real-world Kubernetes cluster.
  • Kubernetes documentation now features user journeys: specific pathways for learning based on who readers are and what readers want to do. Learning Kubernetes is easier than ever for beginners, and more experienced users can find task journeys specific to cluster admins and application developers.

KubeCon

The world’s largest Kubernetes gathering, KubeCon + CloudNativeCon is coming to Shanghai from November 13-15, 2018 and Seattle from December 10-13, 2018. This conference will feature technical sessions, case studies, developer deep dives, salons and more! Register today!

Webinar

Join members of the Kubernetes 1.12 release team on November 6th at 10am PDT to learn about the major features in this release. Register here.

Get Involved

The simplest way to get involved with Kubernetes is by joining one of the many Special Interest Groups (SIGs) that align with your interests. Have something you’d like to broadcast to the Kubernetes community? Share your voice at our weekly community meeting, and through the channels below.

Thank you for your continued feedback and support.

  • Post questions (or answer questions) on Stack Overflow
  • Join the community portal for advocates on K8sPort
  • Follow us on Twitter @Kubernetesio for latest updates
  • Chat with the community on Slack
  • Share your Kubernetes story
  • Dec 31 / 2018
  • 0
Hi Tech

Blog: Health checking gRPC servers on Kubernetes

Author: Ahmet Alp Balkan (Google)

gRPC is on its way to becoming the lingua franca for
communication between cloud-native microservices. If you are deploying gRPC
applications to Kubernetes today, you may be wondering about the best way to
configure health checks. In this article, we will talk about
grpc-health-probe, a
Kubernetes-native way to health check gRPC apps.

If you’re unfamiliar, Kubernetes health
checks

(liveness and readiness probes) is what’s keeping your applications available
while you’re sleeping. They detect unresponsive pods, mark them unhealthy, and
cause these pods to be restarted or rescheduled.

Kubernetes does not
support
gRPC health
checks natively. This leaves the gRPC developers with the following three
approaches when they deploy to Kubernetes:

options for health checking grpc on kubernetes today

  1. httpGet probe: Cannot be natively used with gRPC. You need to refactor
    your app to serve both gRPC and HTTP/1.1 protocols (on different port
    numbers).
  2. tcpSocket probe: Opening a socket to gRPC server is not meaningful,
    since it cannot read the response body.
  3. exec probe: This invokes a program in a container’s ecosystem
    periodically. In the case of gRPC, this means you implement a health RPC
    yourself, then write and ship a client tool with your container.

Can we do better? Absolutely.

Introducing “grpc-health-probe”

To standardize the “exec probe” approach mentioned above, we need:

  • a standard health check “protocol” that can be implemented in any gRPC
    server easily.
  • a standard health check “tool” that can query the health protocol easily.

Thankfully, gRPC has a standard health checking
protocol
. It
can be used easily from any language. Generated code and the utilities for
setting the health status are shipped in nearly all language implementations of
gRPC.

If you
implement
this health check protocol in your gRPC apps, you can then use a standard/common
tool to invoke this Check() method to determine server status.

The next thing you need is the “standard tool”, and it’s the
grpc-health-probe.


With this tool, you can use the same health check configuration in all your gRPC
applications. This approach requires you to:

  1. Find the gRPC “health” module in your favorite language and start using it
    (example Go library).
  2. Ship the
    grpc_health_probe
    binary in your container.
  3. Configure
    Kubernetes “exec” probe to invoke the “grpc_health_probe” tool in the
    container.

In this case, executing “grpc_health_probe” will call your gRPC server over
localhost, since they are in the same pod.

What’s next

grpc-health-probe project is still in its early days and it needs your
feedback. It supports a variety of features like communicating with TLS servers
and configurable connection/RPC timeouts.

If you are running a gRPC server on Kubernetes today, try using the gRPC Health
Protocol and try the grpc-health-probe in your deployments, and give
feedback
.

Further reading

  • Dec 31 / 2018
  • 0
Hi Tech

Blog: Building a Network Bootable Server Farm for Kubernetes with LTSP

Author: Andrei Kvapil (WEDOS)

k8s+ltsp

In this post, I’m going to introduce you to a cool technology for Kubernetes, LTSP. It is useful for large baremetal Kubernetes deployments.

You don’t need to think about installing an OS and binaries on each node anymore. Why? You can do that automatically through Dockerfile!

You can buy and put 100 new servers into a production environment and get them working immediately – it’s really amazing!

Intrigued? Let me walk you through how it works.

Summary

Please note: this is a cool hack, but is not officially supported in Kubernetes.

First, we need to understand how exactly it works.

In short, for all nodes we have prepared the image with the OS, Docker, Kubelet and everything else that you need there. This image with the kernel is building automatically by CI using Dockerfile. End nodes are booting the kernel and OS from this image via the network.

Nodes are using overlays as the root filesystem and after reboot any changes will be lost (like in Docker containers). You have a config-file where you can describe mounts and some initial commands which should be executed during node boot (Example: set root user ssh-key and kubeadm join commands)

Image Preparation Process

We will use LTSP project because it’s gives us everything we need to organize the network booting environment. Basically, LTSP is a pack of shell-scripts which makes our life much easier.

LTSP provides a initramfs module, a few helper-scripts, and the configuration system which prepare the system during the early state of boot, before the main init process call.

This is what the image preparation procedure looks like:

  • You’re deploying the basesystem in the chroot environment.
  • Make any needed changes there, install software.
  • Run the ltsp-build-image command

After that, you will get the squashed image from the chroot with all the software inside. Each node will download this image during the boot and use it as the rootfs. For the update node, you can just reboot it. The new squashed image will be downloaded and mounted into the rootfs.

Server Components

The server part of LTSP includes two components in our case:

  • TFTP-server – TFTP is the initial protocol, it is used the download the kernel, initramfs and main config – lts.conf.
  • NBD-server – NBD protocol is used to distribute the squashed rootfs image to the clients. It is the fastest way, but if you want, it can be replaced by the NFS or AoE protocol.

You should also have:

  • DHCP-server – it will distribute the IP-settings and a few specific options to the clients to make it possible for them to boot from our LTSP-server.

Node Booting Process

This is how the node is booting up

  • The first time, the node will ask DHCP for IP-settings and next-server, filename options.
  • Next, the node will apply settings and download bootloader (pxelinux or grub)
  • Bootloader will download and read config with the kernel and initramfs image.
  • Then bootloader will download the kernel and initramfs and execute it with specific cmdline options.
  • During the boot, initramfs modules will handle options from cmdline and do some actions like connect NBD-device, prepare overlay rootfs, etc.
  • Afterwards it will call the ltsp-init system instead of the normal init.
  • ltsp-init scripts will prepare the system on the earlier stage, before the main init will be called. Basically it applies the setting from lts.conf (main config): write fstab and rc.local entries etc.
  • Call the main init (systemd) which is booting the configured system as usual, mounts shares from fstab, start targets and services, executes commands from rc.local file.
  • In the end you have a fully configured and booted system ready for further operations.

Preparing the Server

As I said before, I’m preparing the LTSP-server with the squashed image automatically using Dockerfile. This method is quite good because you have all steps described in your git repository.
You have versioning, branches, CI and everything that you used to use for preparing your usual Docker projects.

Otherwise, you can deploy the LTSP server manually by executing all steps by hand. This is a good practice for learning and understanding the basic principles.

Just repeat all the steps listed here by hand, just to try to install LTSP without Dockerfile.

Used Patches List

LTSP still has some issues which authors don’t want to apply, yet. However LTSP is easy customizable so I prepared a few patches for myself and will share them here.

I’ll create a fork if the community will warmly accept my solution.

  • feature-grub.diff
    LTSP does not support EFI by default, so I’ve prepared a patch which adds GRUB2 with EFI support.
  • feature_preinit.diff
    This patch adds a PREINIT option to lts.conf, which allows you to run custom commands before the main init call. It may be useful to modify the systemd units and configure the network. It’s remarkable that all environment variables from the boot environment are saved and you can use them in your scripts.
  • feature_initramfs_params_from_lts_conf.diff
    Solves a problem with NBD_TO_RAM option, after this patch you can specify it on lts.conf inside chroot. (not in tftp directory)
  • nbd-server-wrapper.sh
    This is not a patch but a special wrapper script which allows you to run NBD-server in the foreground. It is useful if you want to run it inside a Docker container.

Dockerfile Stages

We will use stage building in our Dockerfile to leave only the needed parts in our Docker image. The unused parts will be removed from the final image.

ltsp-base
(install basic LTSP server software)
   |
   |---basesystem
   |   (prepare chroot with main software and kernel)
   |     |
   |     |---builder
   |     |   (build additional software from sources, if needed)
   |     |
   |     '---ltsp-image
   |         (install additional software, docker, kubelet and build squashed image)
   |
   '---final-stage
       (copy squashed image, kernel and initramfs into first stage)

Stage 1: ltsp-base

Let’s start writing our Dockerfile. This is the first part:

FROM ubuntu:16.04 as ltsp-base

ADD nbd-server-wrapper.sh /bin/
ADD /patches/feature-grub.diff /patches/feature-grub.diff
RUN apt-get -y update \
 && apt-get -y install \
      ltsp-server \
      tftpd-hpa \
      nbd-server \
      grub-common \
      grub-pc-bin \
      grub-efi-amd64-bin \
      curl \
      patch \
 && sed -i 's|in_target mount|in_target_nofail mount|' \
      /usr/share/debootstrap/functions \
  # Add EFI support and Grub bootloader (#1745251)
 && patch -p2 -d /usr/sbin < /patches/feature-grub.diff \
 && rm -rf /var/lib/apt/lists \
 && apt-get clean

At this stage our Docker image has already been installed:

  • NBD-server
  • TFTP-server
  • LTSP-scripts with grub bootloader support (for EFI)

Stage 2: basesystem

In this stage we will prepare a chroot environment with basesystem, and install basic software with the kernel.

We will use the classic debootstrap instead of ltsp-build-client to prepare the base image, because ltsp-build-client will install GUI and few other things which we don’t need for the server deployment.

FROM ltsp-base as basesystem

ARG DEBIAN_FRONTEND=noninteractive

# Prepare base system
RUN debootstrap --arch amd64 xenial /opt/ltsp/amd64

# Install updates
RUN echo "\
      deb http://archive.ubuntu.com/ubuntu xenial main restricted universe multiverse\n\
      deb http://archive.ubuntu.com/ubuntu xenial-updates main restricted universe multiverse\n\
      deb http://archive.ubuntu.com/ubuntu xenial-security main restricted universe multiverse" \
      > /opt/ltsp/amd64/etc/apt/sources.list \
 && ltsp-chroot apt-get -y update \
 && ltsp-chroot apt-get -y upgrade

# Installing LTSP-packages
RUN ltsp-chroot apt-get -y install ltsp-client-core

# Apply initramfs patches
# 1: Read params from /etc/lts.conf during the boot (#1680490)
# 2: Add support for PREINIT variables in lts.conf
ADD /patches /patches
RUN patch -p4 -d /opt/ltsp/amd64/usr/share < /patches/feature_initramfs_params_from_lts_conf.diff \
 && patch -p3 -d /opt/ltsp/amd64/usr/share < /patches/feature_preinit.diff

# Write new local client config for boot NBD image to ram:
RUN echo "[Default]\nLTSP_NBD_TO_RAM = true" \
      > /opt/ltsp/amd64/etc/lts.conf

# Install packages
RUN echo 'APT::Install-Recommends "0";\nAPT::Install-Suggests "0";' \
      >> /opt/ltsp/amd64/etc/apt/apt.conf.d/01norecommend \
 && ltsp-chroot apt-get -y install \
      software-properties-common \
      apt-transport-https \
      ca-certificates \
      ssh \
      bridge-utils \
      pv \
      jq \
      vlan \
      bash-completion \
      screen \
      vim \
      mc \
      lm-sensors \
      htop \
      jnettop \
      rsync \
      curl \
      wget \
      tcpdump \
      arping \
      apparmor-utils \
      nfs-common \
      telnet \
      sysstat \
      ipvsadm \
      ipset \
      make

# Install kernel
RUN ltsp-chroot apt-get -y install linux-generic-hwe-16.04

Note that you may encounter problems with some packages, such as lvm2.
They have not fully optimized for installing in an unprivileged chroot.
Their postinstall scripts try to call some privileged commands which can fail with errors and block the package installation.

Solution:

  • Some of them can be installed before the kernel without any problems (like lvm2)
  • But for some of them you will need to use this workaround to install without the postinstall script.

Stage 3: builder

Now we can build all the necessary software and kernel modules. It’s really cool that you can do that automatically in this stage.
You can skip this stage if you have nothing to do here.

Here is example for install latest MLNX_EN driver:

FROM basesystem as builder

# Set cpuinfo (for building from sources)
RUN cp /proc/cpuinfo /opt/ltsp/amd64/proc/cpuinfo

# Compile Mellanox driver
RUN ltsp-chroot sh -cx \
   '  VERSION=4.3-1.0.1.0-ubuntu16.04-x86_64 \
   && curl -L http://www.mellanox.com/downloads/ofed/MLNX_EN-${VERSION%%-ubuntu*}/mlnx-en-${VERSION}.tgz \
      | tar xzf - \
   && export \
        DRIVER_DIR="$(ls -1 | grep "MLNX_OFED_LINUX-\|mlnx-en-")" \
        KERNEL="$(ls -1t /lib/modules/ | head -n1)" \
   && cd "$DRIVER_DIR" \
   && ./*install --kernel "$KERNEL" --without-dkms --add-kernel-support \
   && cd - \
   && rm -rf "$DRIVER_DIR" /tmp/mlnx-en* /tmp/ofed*'

# Save kernel modules
RUN ltsp-chroot sh -c \
    ' export KERNEL="$(ls -1t /usr/src/ | grep -m1 "^linux-headers" | sed "s/^linux-headers-//g")" \
   && tar cpzf /modules.tar.gz /lib/modules/${KERNEL}/updates'

Stage 4: ltsp-image

In this stage we will install what we built in the previous step:

FROM basesystem as ltsp-image

# Retrieve kernel modules
COPY --from=builder /opt/ltsp/amd64/modules.tar.gz /opt/ltsp/amd64/modules.tar.gz

# Install kernel modules
RUN ltsp-chroot sh -c \
    ' export KERNEL="$(ls -1t /usr/src/ | grep -m1 "^linux-headers" | sed "s/^linux-headers-//g")" \
   && tar xpzf /modules.tar.gz \
   && depmod -a "${KERNEL}" \
   && rm -f /modules.tar.gz'

Then do some additional changes to finalize our ltsp-image:

# Install docker
RUN ltsp-chroot sh -c \
   '  curl -fsSL https://download.docker.com/linux/ubuntu/gpg | apt-key add - \
   && echo "deb https://download.docker.com/linux/ubuntu xenial stable" \
        > /etc/apt/sources.list.d/docker.list \
   && apt-get -y update \
   && apt-get -y install \
        docker-ce=$(apt-cache madison docker-ce | grep 18.06 | head -1 | awk "{print $ 3}")'

# Configure docker options
RUN DOCKER_OPTS="$(echo \
      --storage-driver=overlay2 \
      --iptables=false \
      --ip-masq=false \
      --log-driver=json-file \
      --log-opt=max-size=10m \
      --log-opt=max-file=5 \
      )" \
 && sed "/^ExecStart=/ s|$| $DOCKER_OPTS|g" \
      /opt/ltsp/amd64/lib/systemd/system/docker.service \
      > /opt/ltsp/amd64/etc/systemd/system/docker.service

# Install kubeadm, kubelet and kubectl
RUN ltsp-chroot sh -c \
      '  curl -s https://packages.cloud.google.com/apt/doc/apt-key.gpg | apt-key add - \
      && echo "deb http://apt.kubernetes.io/ kubernetes-xenial main" \
           > /etc/apt/sources.list.d/kubernetes.list \
      && apt-get -y update \
      && apt-get -y install kubelet kubeadm kubectl cri-tools'

# Disable automatic updates
RUN rm -f /opt/ltsp/amd64/etc/apt/apt.conf.d/20auto-upgrades

# Disable apparmor profiles
RUN ltsp-chroot find /etc/apparmor.d \
      -maxdepth 1 \
      -type f \
      -name "sbin.*" \
      -o -name "usr.*" \
      -exec ln -sf "{}" /etc/apparmor.d/disable/ \;

# Write kernel cmdline options
RUN KERNEL_OPTIONS="$(echo \
      init=/sbin/init-ltsp \
      forcepae \
      console=tty1 \
      console=ttyS0,9600n8 \
      nvme_core.default_ps_max_latency_us=0 \
    )" \
 && sed -i "/^CMDLINE_LINUX_DEFAULT=/ s|=.*|=\"${KERNEL_OPTIONS}\"|" \
      "/opt/ltsp/amd64/etc/ltsp/update-kernels.conf"

Then we will make the squashed image from our chroot:

# Cleanup caches
RUN rm -rf /opt/ltsp/amd64/var/lib/apt/lists \
 && ltsp-chroot apt-get clean

# Build squashed image
RUN ltsp-update-image

Stage 5: Final Stage

In the final stage we will save only our squashed image and kernels with initramfs.

FROM ltsp-base
COPY --from=ltsp-image /opt/ltsp/images /opt/ltsp/images
COPY --from=ltsp-image /etc/nbd-server/conf.d /etc/nbd-server/conf.d
COPY --from=ltsp-image /var/lib/tftpboot /var/lib/tftpboot

Ok, now we have docker image which includes:

  • TFTP-server
  • NBD-server
  • configured bootloader
  • kernel with initramfs
  • squashed rootfs image

Usage

OK, now when our docker-image with LTSP-server, kernel, initramfs and squashed rootfs fully prepared we can run the deployment with it.

We can do that as usual, but one more thing is networking.
Unfortunately, we can’t use the standard Kubernetes service abstraction for our deployment, because TFTP can’t work behind the NAT. During the boot, our nodes are not part of Kubernetes cluster and they requires ExternalIP, but Kubernetes always enables NAT for ExternalIPs, and there is no way to override this behavior.

For now I have two ways for avoid this: use hostNetwork: true or use pipework. The second option will also provide you redundancy because, in case of failure, the IP will be moved with the Pod to another node. Unfortunately, pipework is not native and a less secure method.
If you have some better option for that please let me know.

Here is example for deployment with hostNetwork:

apiVersion: extensions/v1beta1
kind: Deployment
metadata:
  name: ltsp-server
  labels:
      app: ltsp-server
spec:
  selector:
    matchLabels:
      name: ltsp-server
  replicas: 1
  template:
    metadata:
      labels:
        name: ltsp-server
    spec:
      hostNetwork: true
      containers:
      - name: tftpd
        image: registry.example.org/example/ltsp:latest
        command: [ "/usr/sbin/in.tftpd", "-L", "-u", "tftp", "-a", ":69", "-s", "/var/lib/tftpboot" ]
        lifecycle:
          postStart:
            exec:
              command: ["/bin/sh", "-c", "cd /var/lib/tftpboot/ltsp/amd64; ln -sf config/lts.conf ." ]
        volumeMounts:
        - name: config
          mountPath: "/var/lib/tftpboot/ltsp/amd64/config"

      - name: nbd-server
        image: registry.example.org/example/ltsp:latest
        command: [ "/bin/nbd-server-wrapper.sh" ]

      volumes:
      - name: config
        configMap:
          name: ltsp-config

As you can see it also requires configmap with lts.conf file.
Here is example part from mine:

apiVersion: v1
kind: ConfigMap
metadata:
  name: ltsp-config
data:
  lts.conf: |
    [default]
    KEEP_SYSTEM_SERVICES           = "ssh ureadahead dbus-org.freedesktop.login1 systemd-logind polkitd cgmanager ufw rpcbind nfs-kernel-server"

    PREINIT_00_TIME                = "ln -sf /usr/share/zoneinfo/Europe/Prague /etc/localtime"
    PREINIT_01_FIX_HOSTNAME        = "sed -i '/^127.0.0.2/d' /etc/hosts"
    PREINIT_02_DOCKER_OPTIONS      = "sed -i 's|^ExecStart=.*|ExecStart=/usr/bin/dockerd -H fd:// --storage-driver overlay2 --iptables=false --ip-masq=false --log-driver=json-file --log-opt=max-size=10m --log-opt=max-file=5|' /etc/systemd/system/docker.service"

    FSTAB_01_SSH                   = "/dev/data/ssh     /etc/ssh          ext4 nofail,noatime,nodiratime 0 0"
    FSTAB_02_JOURNALD              = "/dev/data/journal /var/log/journal  ext4 nofail,noatime,nodiratime 0 0"
    FSTAB_03_DOCKER                = "/dev/data/docker  /var/lib/docker   ext4 nofail,noatime,nodiratime 0 0"

    # Each command will stop script execution when fail
    RCFILE_01_SSH_SERVER           = "cp /rofs/etc/ssh/*_config /etc/ssh; ssh-keygen -A"
    RCFILE_02_SSH_CLIENT           = "mkdir -p /root/.ssh/; echo 'ssh-rsa AAAAB3NzaC1yc2EAAAADAQABAAABAQDBSLYRaORL2znr1V4a3rjDn3HDHn2CsvUNK1nv8+CctoICtJOPXl6zQycI9KXNhANfJpc6iQG1ZPZUR74IiNhNIKvOpnNRPyLZ5opm01MVIDIZgi9g0DUks1g5gLV5LKzED8xYKMBmAfXMxh/nsP9KEvxGvTJB3OD+/bBxpliTl5xY3Eu41+VmZqVOz3Yl98+X8cZTgqx2dmsHUk7VKN9OZuCjIZL9MtJCZyOSRbjuo4HFEssotR1mvANyz+BUXkjqv2pEa0I2vGQPk1VDul5TpzGaN3nOfu83URZLJgCrX+8whS1fzMepUYrbEuIWq95esjn0gR6G4J7qlxyguAb9 admin@kubernetes' >> /root/.ssh/authorized_keys"
    RCFILE_03_KERNEL_DEBUG         = "sysctl -w kernel.unknown_nmi_panic=1 kernel.softlockup_panic=1; modprobe netconsole netconsole=@/vmbr0,@10.9.0.15/"
    RCFILE_04_SYSCTL               = "sysctl -w fs.file-max=20000000 fs.nr_open=20000000 net.ipv4.neigh.default.gc_thresh1=80000 net.ipv4.neigh.default.gc_thresh2=90000 net.ipv4.neigh.default.gc_thresh3=100000"
    RCFILE_05_FORWARD              = "echo 1 > /proc/sys/net/ipv4/ip_forward"
    RCFILE_06_MODULES              = "modprobe br_netfilter"
    RCFILE_07_JOIN_K8S             = "kubeadm join --token 2a4576.504356e45fa3d365 10.9.0.20:6443 --discovery-token-ca-cert-hash sha256:e3b0c44298fc1c149afbf4c8996fb92427ae41e4649b934ca495991b7852b855"
  • KEEP_SYSTEM_SERVICES – during the boot, LTSP automatically removes some services, this variable is needed to prevent this behavior.
  • PREINIT_* – commands listed here will be executed before systemd runs (this function was added by the feature_preinit.diff patch)
  • FSTAB_* – entries written here will be added to the /etc/fstab file.
    As you can see, I use the nofail option, that means that if a partition doesn’t exist, it will continue to boot without error.
    If you have fully diskless nodes you can remove the FSTAB settings or configure the remote filesystem there.
  • RCFILE_* – those commands will be written to rc.local file, which will be called by systemd during the boot.
    Here I load the kernel modules and add some sysctl tunes, then call the kubeadm join command, which adds my node to the Kubernetes cluster.

You can get more details on all the variables used from lts.conf manpage.

Now you can configure your DHCP. Basically you should set the next-server and filename options.

I use ISC-DHCP server, and here is an example dhcpd.conf:

shared-network ltsp-netowrk {
    subnet 10.9.0.0 netmask 255.255.0.0 {
        authoritative;
        default-lease-time -1;
        max-lease-time -1;

        option domain-name              "example.org";
        option domain-name-servers      10.9.0.1;
        option routers                  10.9.0.1;
        next-server                     ltsp-1;  # write LTSP-server hostname here

        if option architecture = 00:07 {
            filename "/ltsp/amd64/grub/x86_64-efi/core.efi";
        } else {
            filename "/ltsp/amd64/grub/i386-pc/core.0";
        }

        range 10.9.200.0 10.9.250.254; 
    }

You can start from this, but what about me, I have multiple LTSP-servers and I configure leases statically for each node via the Ansible playbook.

Try to run your first node. If everything was right, you will have a running system there.
The node also will be added to your Kubernetes cluster.

Now you can try to make your own changes.

If you need something more, note that LTSP can be easily changed to meet your needs.
Feel free to look into the source code and you can find many answers there.

UPD: Many people asking me: Why not simple use CoreOS and Ignition?

I can answer. The main feature here is image preparation process, not configuration. In case with LTSP you have classic Ubuntu system, and everything that can be installed on Ubuntu it can also be written here in the Dockerfile. In case CoreOS you have no so many freedom and you can’t easily add custom kernel modules and packages at the build stage of the boot image.

  • Dec 31 / 2018
  • 0
Hi Tech

Blog: KubeDirector: The easy way to run complex stateful applications on Kubernetes

Author: Thomas Phelan (BlueData)

KubeDirector is an open source project designed to make it easy to run complex stateful scale-out application clusters on Kubernetes. KubeDirector is built using the custom resource definition (CRD) framework and leverages the native Kubernetes API extensions and design philosophy. This enables transparent integration with Kubernetes user/resource management as well as existing clients and tools.

We recently introduced the KubeDirector project, as part of a broader open source Kubernetes initiative we call BlueK8s. I’m happy to announce that the pre-alpha
code for KubeDirector is now available. And in this blog post, I’ll show how it works.

KubeDirector provides the following capabilities:

  • The ability to run non-cloud native stateful applications on Kubernetes without modifying the code. In other words, it’s not necessary to decompose these existing applications to fit a microservices design pattern.
  • Native support for preserving application-specific configuration and state.
  • An application-agnostic deployment pattern, minimizing the time to onboard new stateful applications to Kubernetes.

KubeDirector enables data scientists familiar with data-intensive distributed applications such as Hadoop, Spark, Cassandra, TensorFlow, Caffe2, etc. to run these applications on Kubernetes – with a minimal learning curve and no need to write GO code. The applications controlled by KubeDirector are defined by some basic metadata and an associated package of configuration artifacts. The application metadata is referred to as a KubeDirectorApp resource.

To understand the components of KubeDirector, clone the repository on GitHub using a command similar to:

git clone http://<userid>@github.com/bluek8s/kubedirector.

The KubeDirectorApp definition for the Spark 2.2.1 application is located
in the file kubedirector/deploy/example_catalog/cr-app-spark221e2.json.

 ~> cat kubedirector/deploy/example_catalog/cr-app-spark221e2.json
 {
    "apiVersion": "kubedirector.bluedata.io/v1alpha1",
    "kind": "KubeDirectorApp",
    "metadata": {
        "name" : "spark221e2"
    },
    "spec" : {
        "systemctlMounts": true,
        "config": {
            "node_services": [
                {
                    "service_ids": [
                        "ssh",
                        "spark",
                        "spark_master",
                        "spark_worker"
                    ],
…

The configuration of an application cluster is referred to as a KubeDirectorCluster resource. The
KubeDirectorCluster definition for a sample Spark 2.2.1 cluster is located in the file
kubedirector/deploy/example_clusters/cr-cluster-spark221.e1.yaml.

~> cat kubedirector/deploy/example_clusters/cr-cluster-spark221.e1.yaml
apiVersion: "kubedirector.bluedata.io/v1alpha1"
kind: "KubeDirectorCluster"
metadata:
  name: "spark221e2"
spec:
  app: spark221e2
  roles:
  - name: controller
    replicas: 1
    resources:
      requests:
        memory: "4Gi"
        cpu: "2"
      limits:
        memory: "4Gi"
        cpu: "2"
  - name: worker
    replicas: 2
    resources:
      requests:
        memory: "4Gi"
        cpu: "2"
      limits:
        memory: "4Gi"
        cpu: "2"
  - name: jupyter
…

Running Spark on Kubernetes with KubeDirector

With KubeDirector, it’s easy to run Spark clusters on Kubernetes.

First, verify that Kubernetes (version 1.9 or later) is running, using the command kubectl version

~> kubectl version
Client Version: version.Info{Major:"1", Minor:"11", GitVersion:"v1.11.3", GitCommit:"a4529464e4629c21224b3d52edfe0ea91b072862", GitTreeState:"clean", BuildDate:"2018-09-09T18:02:47Z", GoVersion:"go1.10.3", Compiler:"gc", Platform:"linux/amd64"}
Server Version: version.Info{Major:"1", Minor:"11", GitVersion:"v1.11.3", GitCommit:"a4529464e4629c21224b3d52edfe0ea91b072862", GitTreeState:"clean", BuildDate:"2018-09-09T17:53:03Z", GoVersion:"go1.10.3", Compiler:"gc", Platform:"linux/amd64"}                                    

Deploy the KubeDirector service and the example KubeDirectorApp resource definitions with the commands:

cd kubedirector
make deploy

These will start the KubeDirector pod:

~> kubectl get pods
NAME                           READY     STATUS     RESTARTS     AGE
kubedirector-58cf59869-qd9hb   1/1       Running    0            1m     

List the installed KubeDirector applications with kubectl get KubeDirectorApp

~> kubectl get KubeDirectorApp
NAME           AGE
cassandra311   30m
spark211up     30m
spark221e2     30m

Now you can launch a Spark 2.2.1 cluster using the example KubeDirectorCluster file and the
kubectl create -f deploy/example_clusters/cr-cluster-spark211up.yaml command.
Verify that the Spark cluster has been started:

~> kubectl get pods
NAME                             READY     STATUS    RESTARTS   AGE
kubedirector-58cf59869-djdwl     1/1       Running   0          19m
spark221e2-controller-zbg4d-0    1/1       Running   0          23m
spark221e2-jupyter-2km7q-0       1/1       Running   0          23m
spark221e2-worker-4gzbz-0        1/1       Running   0          23m
spark221e2-worker-4gzbz-1        1/1       Running   0          23m

The running services now include the Spark services:

~> kubectl get service
NAME                                TYPE         CLUSTER-IP        EXTERNAL-IP    PORT(S)                                                    AGE
kubedirector                        ClusterIP    10.98.234.194     <none>         60000/TCP                                                  1d
kubernetes                          ClusterIP    10.96.0.1         <none>         443/TCP                                                    1d
svc-spark221e2-5tg48                ClusterIP    None              <none>         8888/TCP                                                   21s
svc-spark221e2-controller-tq8d6-0   NodePort     10.104.181.123    <none>         22:30534/TCP,8080:31533/TCP,7077:32506/TCP,8081:32099/TCP  20s
svc-spark221e2-jupyter-6989v-0      NodePort     10.105.227.249    <none>         22:30632/TCP,8888:30355/TCP                                20s
svc-spark221e2-worker-d9892-0       NodePort     10.107.131.165    <none>         22:30358/TCP,8081:32144/TCP                                20s
svc-spark221e2-worker-d9892-1       NodePort     10.110.88.221     <none>         22:30294/TCP,8081:31436/TCP                                20s

Pointing the browser at port 31533 connects to the Spark Master UI:

kubedirector

That’s all there is to it!
In fact, in the example above we also deployed a Jupyter notebook along with the Spark cluster.

To start another application (e.g. Cassandra), just specify another KubeDirectorApp file:

kubectl create -f deploy/example_clusters/cr-cluster-cassandra311.yaml

See the running Cassandra cluster:

~> kubectl get pods
NAME                              READY     STATUS    RESTARTS   AGE
cassandra311-seed-v24r6-0         1/1       Running   0          1m
cassandra311-seed-v24r6-1         1/1       Running   0          1m
cassandra311-worker-rqrhl-0       1/1       Running   0          1m
cassandra311-worker-rqrhl-1       1/1       Running   0          1m
kubedirector-58cf59869-djdwl      1/1       Running   0          1d
spark221e2-controller-tq8d6-0     1/1       Running   0          22m
spark221e2-jupyter-6989v-0        1/1       Running   0          22m
spark221e2-worker-d9892-0         1/1       Running   0          22m
spark221e2-worker-d9892-1         1/1       Running   0          22m

Now you have a Spark cluster (with a Jupyter notebook) and a Cassandra cluster running on Kubernetes.
Use kubectl get service to see the set of services.

~> kubectl get service
NAME                                TYPE         CLUSTER-IP       EXTERNAL-IP   PORT(S)                                                   AGE
kubedirector                        ClusterIP    10.98.234.194    <none>        60000/TCP                                                 1d
kubernetes                          ClusterIP    10.96.0.1        <none>        443/TCP                                                   1d
svc-cassandra311-seed-v24r6-0       NodePort     10.96.94.204     <none>        22:31131/TCP,9042:30739/TCP                               3m
svc-cassandra311-seed-v24r6-1       NodePort     10.106.144.52    <none>        22:30373/TCP,9042:32662/TCP                               3m
svc-cassandra311-vhh29              ClusterIP    None             <none>        8888/TCP                                                  3m
svc-cassandra311-worker-rqrhl-0     NodePort     10.109.61.194    <none>        22:31832/TCP,9042:31962/TCP                               3m
svc-cassandra311-worker-rqrhl-1     NodePort     10.97.147.131    <none>        22:31454/TCP,9042:31170/TCP                               3m
svc-spark221e2-5tg48                ClusterIP    None             <none>        8888/TCP                                                  24m
svc-spark221e2-controller-tq8d6-0   NodePort     10.104.181.123   <none>        22:30534/TCP,8080:31533/TCP,7077:32506/TCP,8081:32099/TCP 24m
svc-spark221e2-jupyter-6989v-0      NodePort     10.105.227.249   <none>        22:30632/TCP,8888:30355/TCP                               24m
svc-spark221e2-worker-d9892-0       NodePort     10.107.131.165   <none>        22:30358/TCP,8081:32144/TCP                               24m
svc-spark221e2-worker-d9892-1       NodePort     10.110.88.221    <none>        22:30294/TCP,8081:31436/TCP                               24m

Get Involved

KubeDirector is a fully open source, Apache v2 licensed, project – the first of multiple open source projects within a broader initiative we call BlueK8s.
The pre-alpha code for KubeDirector has just been released and we would love for you to join the growing community of developers, contributors, and adopters.
Follow @BlueK8s on Twitter and get involved through these channels: