:::: MENU ::::

Howk IT-Dienstleistungen

Howk IT Services – Howk IT-Dienstleistungen

Posts Categorized / Hi Tech

  • Dec 31 / 2018
  • 0
Hi Tech

Blog: Introducing the Non-Code Contributor’s Guide

Author: Noah Abrahams (InfoSiftr), Jonas Rosland (VMware), Ihor Dvoretskyi (CNCF)

It was May 2018 in Copenhagen, and the Kubernetes community was enjoying the contributor summit at KubeCon/CloudNativeCon, complete with the first run of the New Contributor Workshop. As a time of tremendous collaboration between contributors, the topics covered ranged from signing the CLA to deep technical conversations. Along with the vast exchange of information and ideas, however, came continued scrutiny of the topics at hand to ensure that the community was being as inclusive and accommodating as possible. Over that spring week, some of the pieces under the microscope included the many themes being covered, and how they were being presented, but also the overarching characteristics of the people contributing and the skill sets involved. From the discussions and analysis that followed grew the idea that the community was not benefiting as much as it could from the many people who wanted to contribute, but whose strengths were in areas other than writing code.

This all led to an effort called the Non-Code Contributor’s Guide.

Now, it’s important to note that Kubernetes is rare, if not unique, in the open source world, in that it was defined very early on as both a project and a community. While the project itself is focused on the codebase, it is the community of people driving it forward that makes the project successful. The community works together with an explicit set of community values, guiding the day-to-day behavior of contributors whether on GitHub, Slack, Discourse, or sitting together over tea or coffee.

By having a community that values people first, and explicitly values a diversity of people, the Kubernetes project is building a product to serve people with diverse needs. The different backgrounds of the contributors bring different approaches to the problem solving, with different methods of collaboration, and all those different viewpoints ultimately create a better project.

The Non-Code Contributor’s Guide aims to make it easy for anyone to contribute to the Kubernetes project in a way that makes sense for them. This can be in many forms, technical and non-technical, based on the person’s knowledge of the project and their available time. Most individuals are not developers, and most of the world’s developers are not paid to fully work on open source projects. Based on this we have started an ever-growing list of possible ways to contribute to the Kubernetes project in a Non-Code way!

Get Involved

Some of the ways that you can contribute to the Kubernetes community without writing a single line of code include:

The guide to get started with Kubernetes project contribution is documented on Github, and as the Non-Code Contributors Guide is a part of that Kubernetes Contributors Guide, it can be found here. As stated earlier, this list is not exhaustive and will continue to be a work in progress.

To date, the typical Non-Code contributions fall into the following categories:

  • Roles that are based on skill sets other than “software developer”
  • Non-Code contributions in primarily code-based roles
  • “Post-Code” roles, that are not code-based, but require knowledge of either the code base or management of the code base

If you, dear reader, have any additional ideas for a Non-Code way to contribute, whether or not it fits in an existing category, the team will always appreciate if you could help us expand the list.

If a contribution of the Non-Code nature appeals to you, please read the Non-Code Contributions document, and then check the Contributor Role Board to see if there are any open positions where your expertise could be best used! If there are no listed open positions that match your skill set, drop on by the #sig-contribex channel on Slack, and we’ll point you in the right direction.

We hope to see you contributing to the Kubernetes community soon!

  • Dec 31 / 2018
  • 0
Hi Tech

Blog: Support for Azure VMSS, Cluster-Autoscaler and User Assigned Identity

Author: Krishnakumar R (KK) (Microsoft), Pengfei Ni (Microsoft)

Introduction

With Kubernetes v1.12, Azure virtual machine scale sets (VMSS) and cluster-autoscaler have reached their General Availability (GA) and User Assigned Identity is available as a preview feature.

Azure VMSS allow you to create and manage identical, load balanced VMs that automatically increase or decrease based on demand or a set schedule. This enables you to easily manage and scale multiple VMs to provide high availability and application resiliency, ideal for large-scale applications like container workloads [1].

Cluster autoscaler allows you to adjust the size of the Kubernetes clusters based on the load conditions automatically.

Another exciting feature which v1.12 brings to the table is the ability to use User Assigned Identities with Kubernetes clusters [12].

In this article, we will do a brief overview of VMSS, cluster autoscaler and user assigned identity features on Azure.

VMSS

Azure’s Virtual Machine Scale sets (VMSS) feature offers users an ability to automatically create VMs from a single central configuration, provide load balancing via L4 and L7 load balancing, provide a path to use availability zones for high availability, provides large-scale VM instances et. al.

VMSS consists of a group of virtual machines, which are identical and can be managed and configured at a group level. More details of this feature in Azure itself can be found at the following link [1].

With Kubernetes v1.12 customers can create k8s cluster out of VMSS instances and utilize VMSS features.

Cluster components on Azure

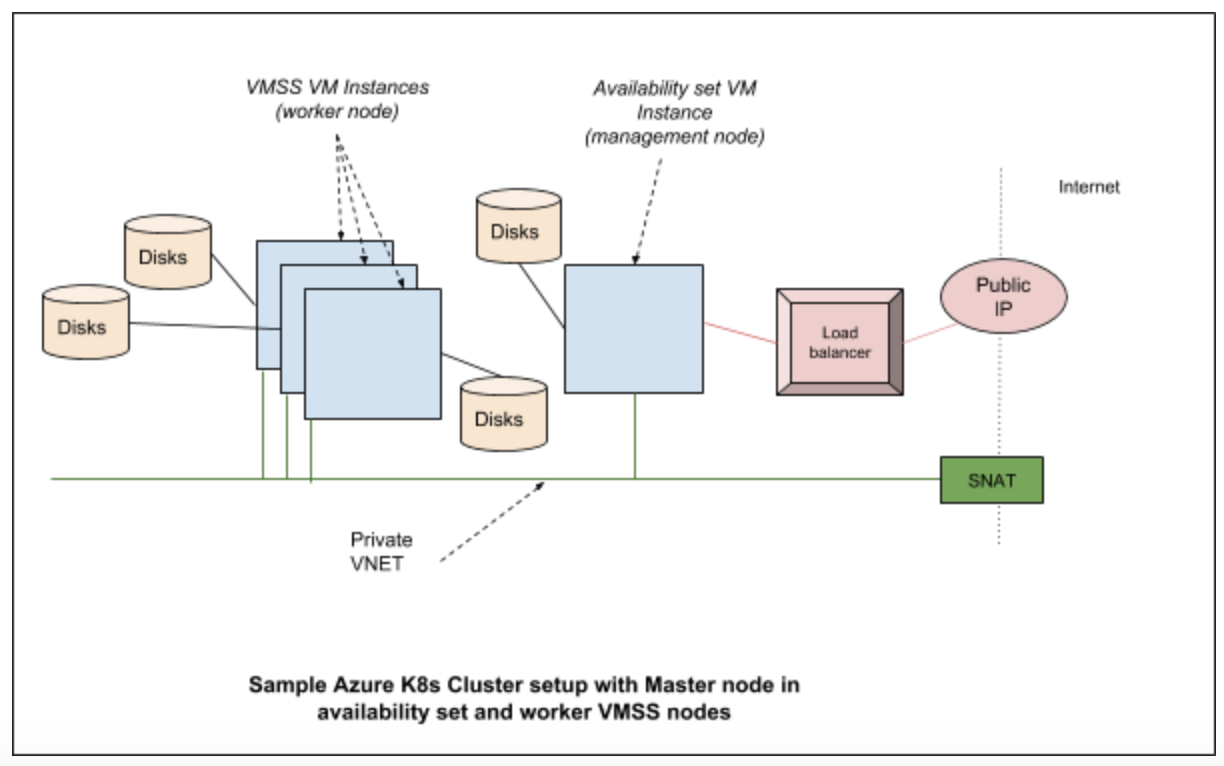
Generally, standalone Kubernetes cluster in Azure consists of the following parts

  • Compute – the VM itself and its properties.
  • Networking – this includes the IPs and load balancers.
  • Storage – the disks which are associated with the VMs.

Compute

Compute in cloud k8s cluster consists of the VMs. These VMs are created by provisioning tools such as acs-engine or AKS (in case of managed service). Eventually, they run various system daemons such as kubelet, kube-api server etc. either as a process (in some versions) or as a docker container.
Networking

In Azure Kubernetes cluster various networking components are brought together to provide features required for users. Typically they consist of the network interfaces, network security groups, public IP resource, VNET (virtual networks), load balancers etc.

Storage

Kubernetes clusters are built on top of disks created in Azure. In a typical configuration, we have managed disks which are used to hold the regular OS images and a separate disk is used for etcd.

Cloud provider components
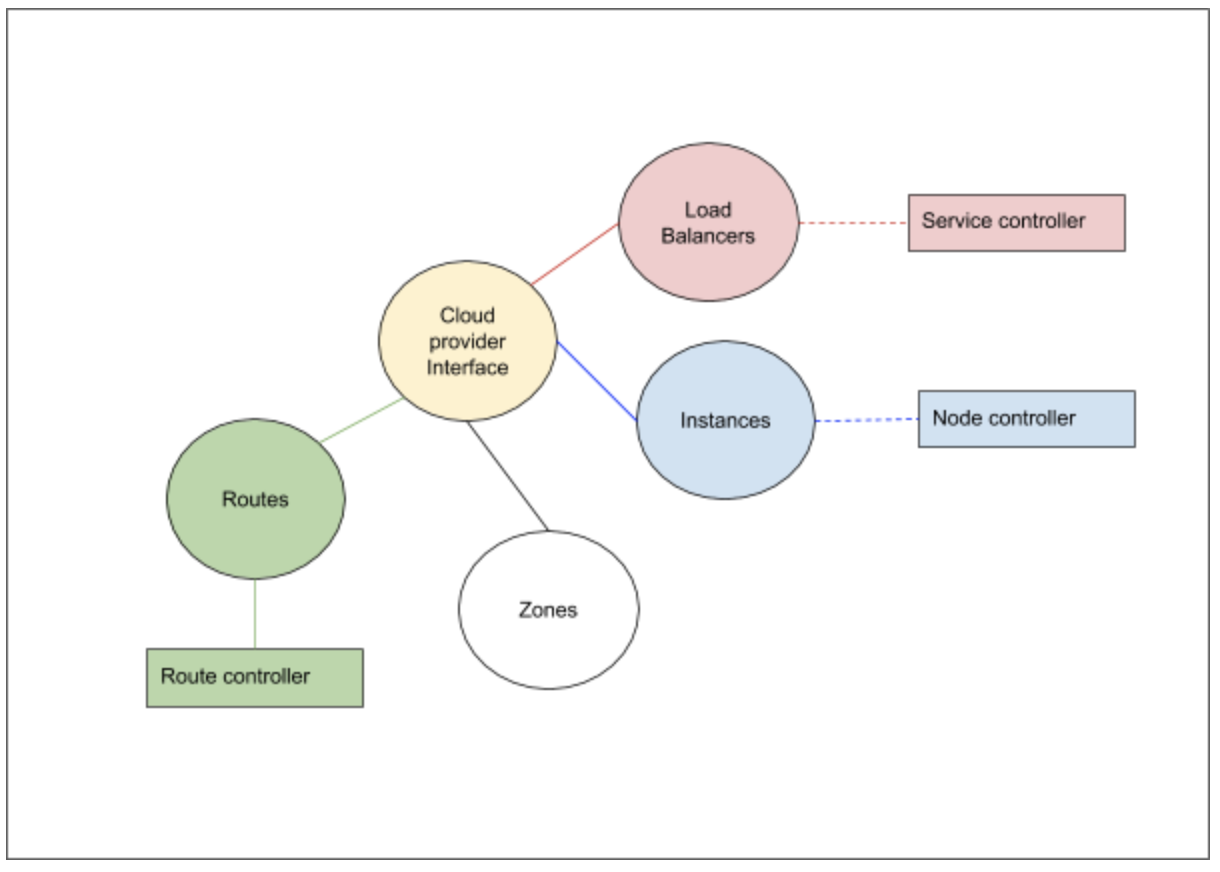
Kubernetes cloud provider interface provides interactions with clouds for managing cloud-specific resources, e.g. public IPs and routes. A good overview of these components is given in [2]. In case of Azure Kubernetes cluster, the Kubernetes interactions go through the Azure cloud provider layer and contact the various services running in the cloud.

The cloud provider implementation of K8s can be largely divided into the following component interfaces which we need to implement:

  1. Load Balancer
  2. Instances
  3. Zones
  4. Routes

In addition to the above interfaces, the storage services from the cloud provider is linked via the volume plugin layer.

Azure cloud provider implementation and VMSS

In the Azure cloud provider, for every type of cluster we implement, there is a VMType option which we specify. In case of VMSS, the VM type is “vmss”. The provisioning software (acs-engine, in future AKS etc.) would setup these values in /etc/kubernetes/azure.json file. Based on this type, various implementations would get instantiated [3]

The load balancer interface provides access to the underlying cloud provider load balancer service. The information about the load balancers and the control operations on them are required for Kubernetes to handle the services which gets hosted on the Kubernetes cluster. For VMSS support the changes ensure that the VMSS instances are part of the load balancer pool as required.

The instances interfaces help the cloud controller to get various details about a node from the cloud provider layer. For example, the details of a node like the IP address, the instance id etc, is obtained by the controller by means of the instances interfaces which the cloud provider layer registers with it. In case of VMSS support, we talk to VMSS service to gather information regarding the instances.

The zones interfaces help the cloud controller to get zone information for each node. Scheduler could spread pods to different availability zones with such information. It is also required for supporting topology aware dynamic provisioning features, e.g. AzureDisk. Each VMSS instances will be labeled with its current zone and region.

The routes interfaces help the cloud controller to setup advanced routes for Pod network. For example, a route with prefix node’s podCIDR and next hop node’s internal IP will be set for each node. In case of VMSS support, the next hops are VMSS virtual machines’ internal IP address.

The Azure volume plugin interfaces have been modified for VMSS to work properly. For example, the attach/detach to the AzureDisk have been modified to perform these operations at VMSS instance level.

Setting up a VMSS cluster on Azure

The following link [4] provides an example of acs-engine to create a Kubernetes cluster.

acs-engine deploy --subscription-id <subscription id> \
    --dns-prefix <dns> --location <location> \
    --api-model examples/kubernetes.json

API model file provides various configurations which acs-engine uses to create a cluster. The API model here [5] gives a good starting configuration to setup the VMSS cluster.

Once a VMSS cluster is created, here are some of the steps you can run to understand more about the cluster setup. Here is the output of kubectl get nodes from a cluster created using the above command:

$ kubectl get nodes
NAME                                 STATUS    ROLES     AGE       VERSION
k8s-agentpool1-92998111-vmss000000   Ready     agent     1h        v1.12.0-rc.2
k8s-agentpool1-92998111-vmss000001   Ready     agent     1h        v1.12.0-rc.2
k8s-master-92998111-0                Ready     master    1h        v1.12.0-rc.2

This cluster consists of two worker nodes and one master. Now how do we check which node is which in Azure parlance? In VMSS listing, we can see a single VMSS:

$ az vmss list -o table -g k8sblogkk1
Name                          ResourceGroup    Location    Zones      Capacity  Overprovision    UpgradePolicy
----------------------------  ---------------  ----------  -------  ----------  ---------------  ---------------
k8s-agentpool1-92998111-vmss  k8sblogkk1       westus2                       2  False            Manual

The nodes which we see as agents (in the kubectl get nodes command) are part of this vmss. We can use the following command to list the instances which are part of the VM scale set:

$ az vmss list-instances -g k8sblogkk1 -n k8s-agentpool1-92998111-vmss -o table
  InstanceId  LatestModelApplied    Location    Name                            ProvisioningState    ResourceGroup    VmId
------------  --------------------  ----------  ------------------------------  -------------------  ---------------  ------------------------------------
           0  True                  westus2     k8s-agentpool1-92998111-vmss_0  Succeeded            K8SBLOGKK1       21c57d6c-9c8f-4a62-970f-63ed0fcba53f
           1  True                  westus2     k8s-agentpool1-92998111-vmss_1  Succeeded            K8SBLOGKK1       840743b9-0076-4a2e-920e-5ba9da296665

The node name does not match the name in the vm scale set, but if we run the following command to list the providerID we can find the matching node which resembles the instance name:

$  kubectl describe nodes k8s-agentpool1-92998111-vmss000000| grep ProviderID
ProviderID:                  azure:///subscriptions/<subscription id>/resourceGroups/k8sblogkk1/providers/Microsoft.Compute/virtualMachineScaleSets/k8s-agentpool1-92998111-vmss/virtualMachines/0

Current Status and Future

Currently the following is supported:

  1. VMSS master nodes and worker nodes
  2. VMSS on worker nodes and Availability set on master nodes combination.
  3. Per vm disk attach
  4. Azure Disk & Azure File support
  5. Availability zones (Alpha)

In future there will be support for the following:

  1. AKS with VMSS support
  2. Per VM instance public IP

Cluster Autoscaler

A Kubernetes cluster consists of nodes. These nodes can be virtual machines, bare metal servers or could be even virtual node (virtual kubelet). To avoid getting lost in permutations and combinations of Kubernetes ecosystem ;-), let’s consider that the cluster we are discussing consists of virtual machines, which are hosted in a cloud (eg: Azure, Google or AWS). What this effectively means is that you have access to virtual machines which run Kubernetes agents and a master node which runs k8s services like API server. A detailed version of k8s architecture can be found here [11].

The number of nodes which are required on a cluster depends on the workload on the cluster. When the load goes up there is a need to increase the nodes and when it subsides, there is a need to reduce the nodes and clean up the resources which are no longer in use. One way this can be taken care of is to manually scale up the nodes which are part of the Kubernetes cluster and manually scale down when the demand reduces. But shouldn’t this be done automatically ? Answer to this question is the Cluster Autoscaler (CA).

The cluster autoscaler itself runs as a pod within the kubernetes cluster. The following figure illustrates the high level view of the setup with respect to the k8s cluster:
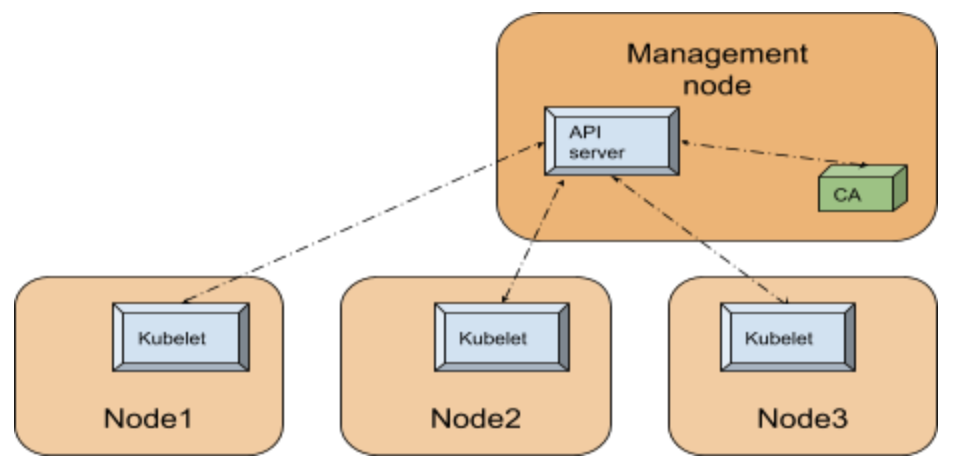
Since Cluster Autoscaler is a pod within the k8s cluster, it can use the in-cluster config and the Kubernetes go client [10] to contact the API server.

Internals

The API server is the central service which manages the state of the k8s cluster utilizing a backing store (an etcd database), runs on the management node or runs within the cloud (in case of managed service such as AKS). For any component within the Kubernetes cluster to figure out the state of the cluster, like for example the nodes registered in the cluster, contacting the API server is the way to go.

In order to simplify our discussion let’s divide the CA functionality into 3 parts as given below:
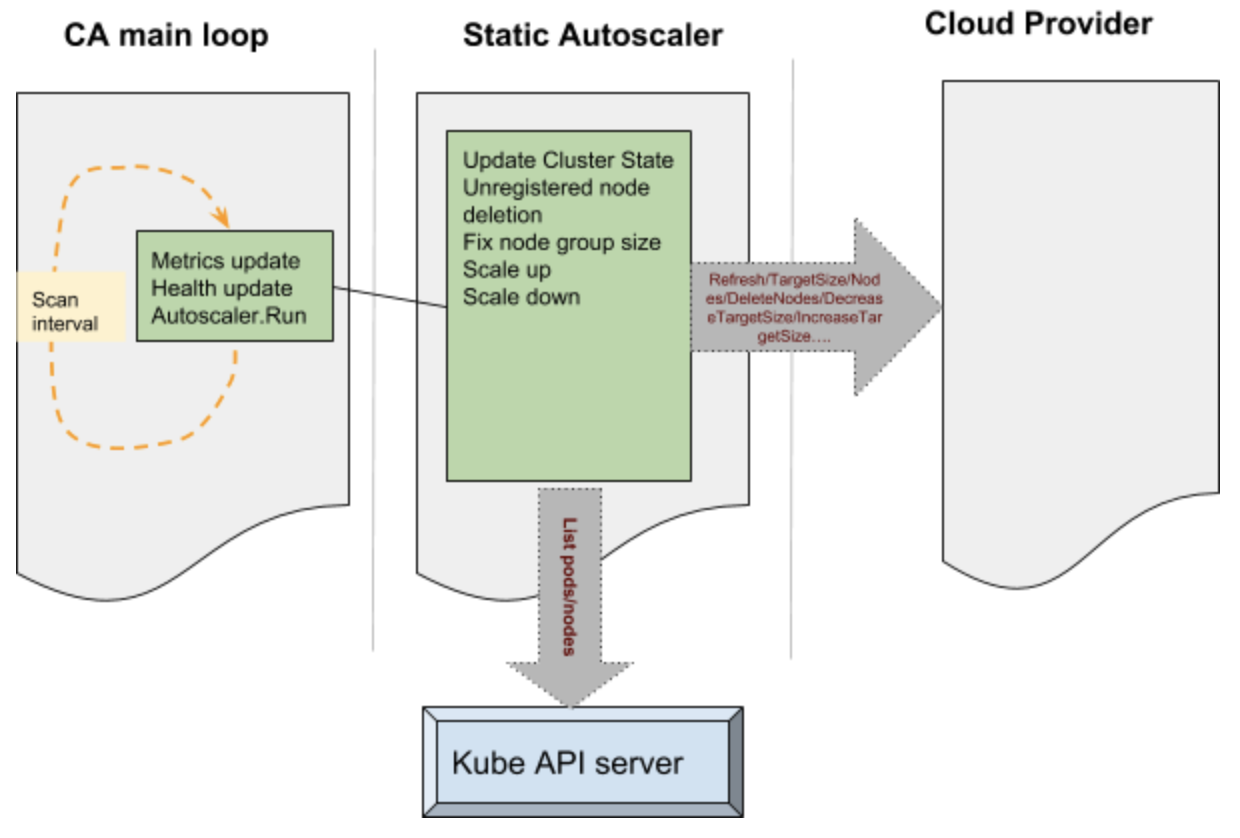
The main portion of the CA is a control loop which keeps running at every scan interval. This loop is responsible for updating the autoscaler metrics and health probes. Before this loop is entered auto scaler performs various operations such as claiming the leader state after performing a Kubernetes leader election. The main loop initializes static autoscaler component. This component initializes the underlying cloud provider based on the parameters passed onto the CA.

Various operations performed by the CA to manage the state of the cluster is passed onto the cloud provider component. Some examples like – increase target size, decrease target size etc, results in the cloud provider component talking to the cloud services internally and performing operations such as adding a node or deleting a node. These operations are performed on group of nodes in the cluster. The static autoscaler also keeps tab on the state of the system by querying the API server – operations such as list pods and list nodes are used to get hold of such information.

The decision to make a scale up is based on pods which remain unscheduled and a variety of checks and balances. The nodes which are free to be scaled down are deleted from the cluster and deleted from the cloud itself. The cluster autoscaler applies checks and balances before scaling up and scaling down – for example the nodes which have been recently added are given special consideration. During the deletion the nodes are drained to ensure that no disruption happens to the running pods.

Setting up CA on Azure:

Cluster Autoscaler is available as an add-on with acs-engine. The following link [15] has an example configuration file used to deploy autoscaler with acs-engine. The following link [8] provides details on manual step by step way to do the same.

In acs-engine case we use the regular command line to deploy:

acs-engine deploy --subscription-id <subscription id> \
    --dns-prefix <dns> --location <location> \
    --api-model examples/kubernetes.json

The main difference are the following lines in the config file at [15] makes sure that CA is deployed as an addon:

"addons": [
          {
            "name": "cluster-autoscaler",
            "enabled": true,
            "config": {
              "minNodes": "1",
              "maxNodes": "5"
            }
          }
        ]

The config section in the json above can be used to provide the configuration to the cluster autoscaler pod, eg: min and max nodes as above.

Once the setup completes we can see that the cluster-autoscaler pod is deployed in the system namespace:

$kubectl get pods -n kube-system  | grep autoscaler
cluster-autoscaler-7bdc74d54c-qvbjs             1/1       Running             1          6m

Here is the output from the CA configmap and events from a sample cluster:

$kubectl -n kube-system describe configmap cluster-autoscaler-status
Name:         cluster-autoscaler-status
Namespace:    kube-system
Labels:       <none>
Annotations:  cluster-autoscaler.kubernetes.io/last-updated=2018-10-02 01:21:17.850010508 +0000 UTC

Data
====
status:
----
Cluster-autoscaler status at 2018-10-02 01:21:17.850010508 +0000 UTC:
Cluster-wide:
  Health:      Healthy (ready=3 unready=0 notStarted=0 longNotStarted=0 registered=3 longUnregistered=0)
               LastProbeTime:      2018-10-02 01:21:17.772229859 +0000 UTC m=+3161.412682204
               LastTransitionTime: 2018-10-02 00:28:49.944222739 +0000 UTC m=+13.584675084
  ScaleUp:     NoActivity (ready=3 registered=3)
               LastProbeTime:      2018-10-02 01:21:17.772229859 +0000 UTC m=+3161.412682204
               LastTransitionTime: 2018-10-02 00:28:49.944222739 +0000 UTC m=+13.584675084
  ScaleDown:   NoCandidates (candidates=0)
               LastProbeTime:      2018-10-02 01:21:17.772229859 +0000 UTC m=+3161.412682204
               LastTransitionTime: 2018-10-02 00:39:50.493307405 +0000 UTC m=+674.133759650

NodeGroups:
  Name:        k8s-agentpool1-92998111-vmss
  Health:      Healthy (ready=2 unready=0 notStarted=0 longNotStarted=0 registered=2 longUnregistered=0 cloudProviderTarget=2 (minSize=1, maxSize=5))
               LastProbeTime:      2018-10-02 01:21:17.772229859 +0000 UTC m=+3161.412682204
               LastTransitionTime: 2018-10-02 00:28:49.944222739 +0000 UTC m=+13.584675084
  ScaleUp:     NoActivity (ready=2 cloudProviderTarget=2)
               LastProbeTime:      2018-10-02 01:21:17.772229859 +0000 UTC m=+3161.412682204
               LastTransitionTime: 2018-10-02 00:28:49.944222739 +0000 UTC m=+13.584675084
  ScaleDown:   NoCandidates (candidates=0)
               LastProbeTime:      2018-10-02 01:21:17.772229859 +0000 UTC m=+3161.412682204
               LastTransitionTime: 2018-10-02 00:39:50.493307405 +0000 UTC m=+674.133759650


Events:
  Type    Reason          Age   From                Message
  ----    ------          ----  ----                -------
  Normal  ScaleDownEmpty  42m   cluster-autoscaler  Scale-down: removing empty node k8s-agentpool1-92998111-vmss000002

As can be seen the events, the cluster autoscaler scaled down and deleted a node as there was no load on this cluster. The rest of the configmap in this case indicates that there are no further actions which the autoscaler is taking at this moment.

Current status and future:

Cluster Autoscaler currently supports four VM types: standard (VMAS), VMSS, ACS and AKS. In the future, Cluster Autoscaler will be integrated within AKS product, so that users can enable it by one-click.

User Assigned Identity

Inorder for the Kubernetes cluster components to securely talk to the cloud services, it needs to authenticate with the cloud provider. In Azure Kubernetes clusters, up until now this was done using two ways – Service Principals or Managed Identities. In case of service principal the credentials are stored within the cluster and there are password rotation and other challenges which user needs to incur to accommodate this model. Managed service identities takes out this burden from the user and manages the service instances directly [12].

There are two kinds of managed identities possible – one is system assigned and another is user assigned. In case of system assigned identity each vm in the Kubernetes cluster is assigned a managed identity during creation. This identity is used by various Kubernetes components needing access to Azure resources. Examples to these operations are getting/updating load balancer configuration, getting/updating vm information etc. With the system assigned managed identity, user has no control over the identity which is assigned to the underlying vm. The system automatically assigns it and this reduces the flexibility for the user.

With v1.12 we bring user assigned managed identity support for Kubernetes. With this support user does not have to manage any passwords but at the same time has the flexibility to manage the identity which is used by the cluster. For example if the user needs to allow access to a cluster for a specific storage account or a Azure key vault, the user assigned identity can be created in advance and key vault access provided.

Internals

To understand the internals, we will focus on a cluster created using acs-engine. This can be configured in other ways, but the basic interactions are of the same pattern.

The acs-engine sets up the cluster with the required configuration. The /etc/kubernetes/azure.json file provides a way for the cluster components (eg: kube-apiserver) to gather configuration on how to access the cloud resources. In a user managed identity cluster there is a value filled with the key as UserAssignedIdentityID. This value is filled with the client id of the user assigned identity created by acs-engine or provided by the user, however the case may be. The code which does the authentication for Kubernetes on azure can be found here [14]. This code uses Azure adal packages to get authenticated to access various resources in the cloud. In case of user assigned identity the following API call is made to get new token:

adal.NewServicePrincipalTokenFromMSIWithUserAssignedID(msiEndpoint,
env.ServiceManagementEndpoint,
config.UserAssignedIdentityID)

This calls hits either the instance metadata service or the vm extension [12] to gather the token which is then used to access various resources.

Setting up a cluster with user assigned identity

With the upstream support for user assigned identity in v1.12, it is now supported in the acs-engine to create a cluster with the user assigned identity. The json config files present here [13] can be used to create a cluster with user assigned identity. The same step used to create a vmss cluster can be used to create a cluster which has user assigned identity assigned.

acs-engine deploy --subscription-id <subscription id> \
    --dns-prefix <dns> --location <location> \
    --api-model examples/kubernetes-msi-userassigned/kube-vmss.json

The main config values here are the following:

"useManagedIdentity": true
"userAssignedID": "acsenginetestid"

The first one useManagedIdentity indicates to acs-engine that we are going to use the managed identity extension. This sets up the necessary packages and extensions required for the managed identities to work. The next one userAssignedID provides the information on the user identity which is to be used with the cluster.

Current status and future

Currently we support the user assigned identity creation with the cluster using deploy of the acs-engine. In future this will become part of AKS.

Get involved

For azure specific discussions – please checkout the Azure SIG page at [6] and come and join the #sig-azure slack channel for more.

For CA, please checkout the Autoscaler project here [7] and join the #sig-autoscaling Slack for more discussions.

For the acs-engine (the unmanaged variety) on Azure docs can be found here: [9]. More details about the managed service from Azure Kubernetes Service (AKS) here [5].

References

1) https://docs.microsoft.com/en-us/azure/virtual-machine-scale-sets/overview

2) https://kubernetes.io/docs/concepts/architecture/cloud-controller/

3) https://github.com/kubernetes/kubernetes/blob/master/pkg/cloudprovider/providers/azure/azure_vmss.go

4) https://github.com/Azure/acs-engine/blob/master/docs/kubernetes/deploy.md

5) https://docs.microsoft.com/en-us/azure/aks/

6) https://github.com/kubernetes/community/tree/master/sig-azure

7) https://github.com/kubernetes/autoscaler

8) https://github.com/kubernetes/autoscaler/blob/master/cluster-autoscaler/cloudprovider/azure/README.md

9) https://github.com/Azure/acs-engine

10) https://github.com/kubernetes/client-go

11) https://kubernetes.io/docs/concepts/architecture/

12) https://docs.microsoft.com/en-us/azure/active-directory/managed-identities-azure-resources/overview

13) https://github.com/Azure/acs-engine/tree/master/examples/kubernetes-msi-userassigned

14) https://github.com/kubernetes/kubernetes/blob/master/pkg/cloudprovider/providers/azure/auth/azure_auth.go

15) https://github.com/Azure/acs-engine/tree/master/examples/addons/cluster-autoscaler

  • Dec 31 / 2018
  • 0
Hi Tech

Blog: Introducing Volume Snapshot Alpha for Kubernetes

Author: Jing Xu (Google) Xing Yang (Huawei), Saad Ali (Google)

Kubernetes v1.12 introduces alpha support for volume snapshotting. This feature allows creating/deleting volume snapshots, and the ability to create new volumes from a snapshot natively using the Kubernetes API.

What is a Snapshot?

Many storage systems (like Google Cloud Persistent Disks, Amazon Elastic Block Storage, and many on-premise storage systems) provide the ability to create a “snapshot” of a persistent volume. A snapshot represents a point-in-time copy of a volume. A snapshot can be used either to provision a new volume (pre-populated with the snapshot data) or to restore the existing volume to a previous state (represented by the snapshot).

Why add Snapshots to Kubernetes?

The Kubernetes volume plugin system already provides a powerful abstraction that automates the provisioning, attaching, and mounting of block and file storage.

Underpinning all these features is the Kubernetes goal of workload portability: Kubernetes aims to create an abstraction layer between distributed systems applications and underlying clusters so that applications can be agnostic to the specifics of the cluster they run on and application deployment requires no “cluster specific” knowledge.

The Kubernetes Storage SIG identified snapshot operations as critical functionality for many stateful workloads. For example, a database administrator may want to snapshot a database volume before starting a database operation.

By providing a standard way to trigger snapshot operations in the Kubernetes API, Kubernetes users can now handle use cases like this without having to go around the Kubernetes API (and manually executing storage system specific operations).

Instead, Kubernetes users are now empowered to incorporate snapshot operations in a cluster agnostic way into their tooling and policy with the comfort of knowing that it will work against arbitrary Kubernetes clusters regardless of the underlying storage.

Additionally these Kubernetes snapshot primitives act as basic building blocks that unlock the ability to develop advanced, enterprise grade, storage administration features for Kubernetes: such as data protection, data replication, and data migration.

Which volume plugins support Kubernetes Snapshots?

Kubernetes supports three types of volume plugins: in-tree, Flex, and CSI. See Kubernetes Volume Plugin FAQ for details.

Snapshots are only supported for CSI drivers (not for in-tree or Flex). To use the Kubernetes snapshots feature, ensure that a CSI Driver that implements snapshots is deployed on your cluster.

As of the publishing of this blog, the following CSI drivers support snapshots:

Snapshot support for other drivers is pending, and should be available soon. Read the “Container Storage Interface (CSI) for Kubernetes Goes Beta” blog post to learn more about CSI and how to deploy CSI drivers.

Kubernetes Snapshots API

Similar to the API for managing Kubernetes Persistent Volumes, Kubernetes Volume Snapshots introduce three new API objects for managing snapshots:

  • VolumeSnapshot
    • Created by a Kubernetes user to request creation of a snapshot for a specified volume. It contains information about the snapshot operation such as the timestamp when the snapshot was taken and whether the snapshot is ready to use.
    • Similar to the PersistentVolumeClaim object, the creation and deletion of this object represents a user desire to create or delete a cluster resource (a snapshot).
  • VolumeSnapshotContent
    • Created by the CSI volume driver once a snapshot has been successfully created. It contains information about the snapshot including snapshot ID.
    • Similar to the PersistentVolume object, this object represents a provisioned resource on the cluster (a snapshot).
    • Like PersistentVolumeClaim and PersistentVolume objects, once a snapshot is created, the VolumeSnapshotContent object binds to the VolumeSnapshot for which it was created (with a one-to-one mapping).
  • VolumeSnapshotClass
    • Created by cluster administrators to describe how snapshots should be created. including the driver information, the secrets to access the snapshot, etc.

It is important to note that unlike the core Kubernetes Persistent Volume objects, these Snapshot objects are defined as CustomResourceDefinitions (CRDs). The Kubernetes project is moving away from having resource types pre-defined in the API server, and is moving towards a model where the API server is independent of the API objects. This allows the API server to be reused for projects other than Kubernetes, and consumers (like Kubernetes) can simply install the resource types they require as CRDs.

CSI Drivers that support snapshots will automatically install the required CRDs. Kubernetes end users only need to verify that a CSI driver that supports snapshots is deployed on their Kubernetes cluster.

In addition to these new objects, a new, DataSource field has been added to the PersistentVolumeClaim object:

type PersistentVolumeClaimSpec struct {
	AccessModes []PersistentVolumeAccessMode
	Selector *metav1.LabelSelector
	Resources ResourceRequirements
	VolumeName string
	StorageClassName *string
	VolumeMode *PersistentVolumeMode
	DataSource *TypedLocalObjectReference
}

This new alpha field enables a new volume to be created and automatically pre-populated with data from an existing snapshot.

Kubernetes Snapshots Requirements

Before using Kubernetes Volume Snapshotting, you must:

  • Ensure a CSI driver implementing snapshots is deployed and running on your Kubernetes cluster.
  • Enable the Kubernetes Volume Snapshotting feature via new Kubernetes feature gate (disabled by default for alpha):
    • Set the following flag on the API server binary: --feature-gates=VolumeSnapshotDataSource=true

Before creating a snapshot, you also need to specify CSI driver information for snapshots by creating a VolumeSnapshotClass object and setting the snapshotter field to point to your CSI driver. In the example of VolumeSnapshotClass below, the CSI driver is com.example.csi-driver. You need at least one VolumeSnapshotClass object per snapshot provisioner. You can also set a default VolumeSnapshotClass for each individual CSI driver by putting an annotation snapshot.storage.kubernetes.io/is-default-class: "true" in the class definition.

apiVersion: snapshot.storage.k8s.io/v1alpha1
kind: VolumeSnapshotClass
metadata:
  name: default-snapclass
  annotations:
    snapshot.storage.kubernetes.io/is-default-class: "true"
snapshotter: com.example.csi-driver


apiVersion: snapshot.storage.k8s.io/v1alpha1
kind: VolumeSnapshotClass
metadata:
  name: csi-snapclass
snapshotter: com.example.csi-driver
parameters:
  fakeSnapshotOption: foo
  csiSnapshotterSecretName: csi-secret
  csiSnapshotterSecretNamespace: csi-namespace

You must set any required opaque parameters based on the documentation for your CSI driver. As the example above shows, the parameter fakeSnapshotOption: foo and any referenced secret(s) will be passed to CSI driver during snapshot creation and deletion. The default CSI external-snapshotter reserves the parameter keys csiSnapshotterSecretName and csiSnapshotterSecretNamespace. If specified, it fetches the secret and passes it to the CSI driver when creating and deleting a snapshot.

And finally, before creating a snapshot, you must provision a volume using your CSI driver and populate it with some data that you want to snapshot (see the CSI blog post on how to create and use CSI volumes).

Creating a new Snapshot with Kubernetes

Once a VolumeSnapshotClass object is defined and you have a volume you want to snapshot, you may create a new snapshot by creating a VolumeSnapshot object.

The source of the snapshot specifies the volume to create a snapshot from. It has two parameters:

  • kind – must be PersistentVolumeClaim
  • name – the PVC API object name

The namespace of the volume to snapshot is assumed to be the same as the namespace of the VolumeSnapshot object.

apiVersion: snapshot.storage.k8s.io/v1alpha1
kind: VolumeSnapshot
metadata:
  name: new-snapshot-demo
  namespace: demo-namespace
spec:
  snapshotClassName: csi-snapclass
  source:
    name: mypvc
    kind: PersistentVolumeClaim

In the VolumeSnapshot spec, user can specify the VolumeSnapshotClass which has the information about which CSI driver should be used for creating the snapshot . When the VolumeSnapshot object is created, the parameter fakeSnapshotOption: foo and any referenced secret(s) from the VolumeSnapshotClass are passed to the CSI plugin com.example.csi-driver via a CreateSnapshot call.

In response, the CSI driver triggers a snapshot of the volume and then automatically creates a VolumeSnapshotContent object to represent the new snapshot, and binds the new VolumeSnapshotContent object to the VolumeSnapshot, making it ready to use. If the CSI driver fails to create the snapshot and returns error, the snapshot controller reports the error in the status of VolumeSnapshot object and does not retry (this is different from other controllers in Kubernetes, and is to prevent snapshots from being taken at an unexpected time).

If a snapshot class is not specified, the external snapshotter will try to find and set a default snapshot class for the snapshot. The CSI driver specified by snapshotter in the default snapshot class must match the CSI driver specified by the provisioner in the storage class of the PVC.

Please note that the alpha release of Kubernetes Snapshot does not provide any consistency guarantees. You have to prepare your application (pause application, freeze filesystem etc.) before taking the snapshot for data consistency.

You can verify that the VolumeSnapshot object is created and bound with VolumeSnapshotContent by running kubectl describe volumesnapshot:

  • Ready should be set to true under Status to indicate this volume snapshot is ready for use.
  • Creation Time field indicates when the snapshot is actually created (cut).
  • Restore Size field indicates the minimum volume size when restoring a volume from the snapshot.
  • Snapshot Content Name field in the spec points to the VolumeSnapshotContent object created for this snapshot.

Importing an existing snapshot with Kubernetes

You can always import an existing snapshot to Kubernetes by manually creating a VolumeSnapshotContent object to represent the existing snapshot. Because VolumeSnapshotContent is a non-namespace API object, only a system admin may have the permission to create it. Once a VolumeSnapshotContent object is created, the user can create a VolumeSnapshot object pointing to the VolumeSnapshotContent object. The external-snapshotter controller will mark snapshot as ready after verifying the snapshot exists and the binding between VolumeSnapshot and VolumeSnapshotContent objects is correct. Once bound, the snapshot is ready to use in Kubernetes.

A VolumeSnapshotContent object should be created with the following fields to represent a pre-provisioned snapshot:

  • csiVolumeSnapshotSource – Snapshot identifying information.
    • snapshotHandle – name/identifier of the snapshot. This field is required.
    • driver – CSI driver used to handle this volume. This field is required. It must match the snapshotter name in the snapshot controller.
    • creationTime and restoreSize – these fields are not required for pre-provisioned volumes. The external-snapshotter controller will automatically update them after creation.
  • volumeSnapshotRef – Pointer to the VolumeSnapshot object this object should bind to.
    • name and namespace – It specifies the name and namespace of the VolumeSnapshot object which the content is bound to.
    • UID – these fields are not required for pre-provisioned volumes.The external-snapshotter controller will update the field automatically after binding. If user specifies UID field, he/she must make sure that it matches with the binding snapshot’s UID. If the specified UID does not match the binding snapshot’s UID, the content is considered an orphan object and the controller will delete it and its associated snapshot.
  • snapshotClassName – This field is optional. The external-snapshotter controller will update the field automatically after binding.
apiVersion: snapshot.storage.k8s.io/v1alpha1
kind: VolumeSnapshotContent
metadata:
  name: static-snapshot-content
spec:
  csiVolumeSnapshotSource:
    driver: com.example.csi-driver
    snapshotHandle: snapshotcontent-example-id
  volumeSnapshotRef:
    kind: VolumeSnapshot
    name: static-snapshot-demo
    namespace: demo-namespace

A VolumeSnapshot object should be created to allow a user to use the snapshot:

  • snapshotClassName – name of the volume snapshot class. This field is optional. If set, the snapshotter field in the snapshot class must match the snapshotter name of the snapshot controller. If not set, the snapshot controller will try to find a default snapshot class.
  • snapshotContentName – name of the volume snapshot content. This field is required for pre-provisioned volumes.
apiVersion: snapshot.storage.k8s.io/v1alpha1
kind: VolumeSnapshot
metadata:
  name: static-snapshot-demo
  namespace: demo-namespace
spec:
  snapshotClassName: csi-snapclass
  snapshotContentName: static-snapshot-content

Once these objects are created, the snapshot controller will bind them together, and set the field Ready (under Status) to True to indicate the snapshot is ready to use.

Provision a new volume from a snapshot with Kubernetes

To provision a new volume pre-populated with data from a snapshot object, use the new dataSource field in the PersistentVolumeClaim. It has three parameters:

  • name – name of the VolumeSnapshot object representing the snapshot to use as source
  • kind – must be VolumeSnapshot
  • apiGroup – must be snapshot.storage.k8s.io

The namespace of the source VolumeSnapshot object is assumed to be the same as the namespace of the PersistentVolumeClaim object.

apiVersion: v1
kind: PersistentVolumeClaim
metadata:
  name: pvc-restore
  Namespace: demo-namespace
spec:
  storageClassName: csi-storageclass
  dataSource:
    name: new-snapshot-demo
    kind: VolumeSnapshot
    apiGroup: snapshot.storage.k8s.io
  accessModes:
    - ReadWriteOnce
  resources:
    requests:
      storage: 1Gi

When the PersistentVolumeClaim object is created, it will trigger provisioning of a new volume that is pre-populated with data from the specified snapshot.

As a storage vendor, how do I add support for snapshots to my CSI driver?

To implement the snapshot feature, a CSI driver MUST add support for additional controller capabilities CREATE_DELETE_SNAPSHOT and LIST_SNAPSHOTS, and implement additional controller RPCs: CreateSnapshot, DeleteSnapshot, and ListSnapshots. For details, see the CSI spec.

Although Kubernetes is as minimally prescriptive on the packaging and deployment of a CSI Volume Driver as possible, it provides a suggested mechanism for deploying an arbitrary containerized CSI driver on Kubernetes to simplify deployment of containerized CSI compatible volume drivers.

As part of this recommended deployment process, the Kubernetes team provides a number of sidecar (helper) containers, including a new external-snapshotter sidecar container.

The external-snapshotter watches the Kubernetes API server for VolumeSnapshot and VolumeSnapshotContent objects and triggers CreateSnapshot and DeleteSnapshot operations against a CSI endpoint. The CSI external-provisioner sidecar container has also been updated to support restoring volume from snapshot using the new dataSource PVC field.

In order to support snapshot feature, it is recommended that storage vendors deploy the external-snapshotter sidecar containers in addition to the external provisioner the external attacher, along with their CSI driver in a statefulset as shown in the following diagram.

In this example deployment yaml file, two sidecar containers, the external provisioner and the external snapshotter, and CSI drivers are deployed together with the hostpath CSI plugin in the statefulset pod. Hostpath CSI plugin is a sample plugin, not for production.

What are the limitations of alpha?

The alpha implementation of snapshots for Kubernetes has the following limitations:

  • Does not support reverting an existing volume to an earlier state represented by a snapshot (alpha only supports provisioning a new volume from a snapshot).
  • Does not support “in-place restore” of an existing PersistentVolumeClaim from a snapshot: i.e. provisioning a new volume from a snapshot, but updating an existing PersistentVolumeClaim to point to the new volume and effectively making the PVC appear to revert to an earlier state (alpha only supports using a new volume provisioned from a snapshot via a new PV/PVC).
  • No snapshot consistency guarantees beyond any guarantees provided by storage system (e.g. crash consistency).

What’s next?

Depending on feedback and adoption, the Kubernetes team plans to push the CSI Snapshot implementation to beta in either 1.13 or 1.14.

How can I learn more?

Check out additional documentation on the snapshot feature here: http://k8s.io/docs/concepts/storage/volume-snapshots and https://kubernetes-csi.github.io/docs/

How do I get involved?

This project, like all of Kubernetes, is the result of hard work by many contributors from diverse backgrounds working together.

In addition to the contributors who have been working on the Snapshot feature:

We offer a huge thank you to all the contributors in Kubernetes Storage SIG and CSI community who helped review the design and implementation of the project, including but not limited to the following:

If you’re interested in getting involved with the design and development of CSI or any part of the Kubernetes Storage system, join the Kubernetes Storage Special Interest Group (SIG). We’re rapidly growing and always welcome new contributors.

  • Dec 31 / 2018
  • 0
Hi Tech

Blog: Kubernetes v1.12: Introducing RuntimeClass

Author: Tim Allclair (Google)

Kubernetes originally launched with support for Docker containers running native applications on a Linux host. Starting with rkt in Kubernetes 1.3 more runtimes were coming, which lead to the development of the Container Runtime Interface (CRI). Since then, the set of alternative runtimes has only expanded: projects like Kata Containers and gVisor were announced for stronger workload isolation, and Kubernetes’ Windows support has been steadily progressing.

With runtimes targeting so many different use cases, a clear need for mixed runtimes in a cluster arose. But all these different ways of running containers have brought a new set of problems to deal with:

  • How do users know which runtimes are available, and select the runtime for their workloads?
  • How do we ensure pods are scheduled to the nodes that support the desired runtime?
  • Which runtimes support which features, and how can we surface incompatibilities to the user?
  • How do we account for the varying resource overheads of the runtimes?

RuntimeClass aims to solve these issues.

RuntimeClass in Kubernetes 1.12

RuntimeClass was recently introduced as an alpha feature in Kubernetes 1.12. The initial implementation focuses on providing a runtime selection API, and paves the way to address the other open problems.

The RuntimeClass resource represents a container runtime supported in a Kubernetes cluster. The cluster provisioner sets up, configures, and defines the concrete runtimes backing the RuntimeClass. In its current form, a RuntimeClassSpec holds a single field, the RuntimeHandler. The RuntimeHandler is interpreted by the CRI implementation running on a node, and mapped to the actual runtime configuration. Meanwhile the PodSpec has been expanded with a new field, RuntimeClassName, which names the RuntimeClass that should be used to run the pod.

Why is RuntimeClass a pod level concept? The Kubernetes resource model expects certain resources to be shareable between containers in the pod. If the pod is made up of different containers with potentially different resource models, supporting the necessary level of resource sharing becomes very challenging. For example, it is extremely difficult to support a loopback (localhost) interface across a VM boundary, but this is a common model for communication between two containers in a pod.

What’s next?

The RuntimeClass resource is an important foundation for surfacing runtime properties to the control plane. For example, to implement scheduler support for clusters with heterogeneous nodes supporting different runtimes, we might add NodeAffinity terms to the RuntimeClass definition. Another area to address is managing the variable resource requirements to run pods of different runtimes. The Pod Overhead proposal was an early take on this that aligns nicely with the RuntimeClass design, and may be pursued further.

Many other RuntimeClass extensions have also been proposed, and will be revisited as the feature continues to develop and mature. A few more extensions that are being considered include:

  • Surfacing optional features supported by runtimes, and better visibility into errors caused by incompatible features.
  • Automatic runtime or feature discovery, to support scheduling decisions without manual configuration.
  • Standardized or conformant RuntimeClass names that define a set of properties that should be supported across clusters with RuntimeClasses of the same name.
  • Dynamic registration of additional runtimes, so users can install new runtimes on existing clusters with no downtime.
  • “Fitting” a RuntimeClass to a pod’s requirements. For instance, specifying runtime properties and letting the system match an appropriate RuntimeClass, rather than explicitly assigning a RuntimeClass by name.

RuntimeClass will be under active development at least through 2019, and we’re excited to see the feature take shape, starting with the RuntimeClass alpha in Kubernetes 1.12.

Learn More

  • Dec 31 / 2018
  • 0
Hi Tech

Blog: Topology-Aware Volume Provisioning in Kubernetes

Author: Michelle Au (Google)

The multi-zone cluster experience with persistent volumes is improving in Kubernetes 1.12 with the topology-aware dynamic provisioning beta feature. This feature allows Kubernetes to make intelligent decisions when dynamically provisioning volumes by getting scheduler input on the best place to provision a volume for a pod. In multi-zone clusters, this means that volumes will get provisioned in an appropriate zone that can run your pod, allowing you to easily deploy and scale your stateful workloads across failure domains to provide high availability and fault tolerance.

Previous challenges

Before this feature, running stateful workloads with zonal persistent disks (such as AWS ElasticBlockStore, Azure Disk, GCE PersistentDisk) in multi-zone clusters had many challenges. Dynamic provisioning was handled independently from pod scheduling, which meant that as soon as you created a PersistentVolumeClaim (PVC), a volume would get provisioned. This meant that the provisioner had no knowledge of what pods were using the volume, and any pod constraints it had that could impact scheduling.

This resulted in unschedulable pods because volumes were provisioned in zones that:

  • did not have enough CPU or memory resources to run the pod
  • conflicted with node selectors, pod affinity or anti-affinity policies
  • could not run the pod due to taints

Another common issue was that a non-StatefulSet pod using multiple persistent volumes could have each volume provisioned in a different zone, again resulting in an unschedulable pod.

Suboptimal workarounds included overprovisioning of nodes, or manual creation of volumes in the correct zones, making it difficult to dynamically deploy and scale stateful workloads.

The topology-aware dynamic provisioning feature addresses all of the above issues.

Supported Volume Types

In 1.12, the following drivers support topology-aware dynamic provisioning:

  • AWS EBS
  • Azure Disk
  • GCE PD (including Regional PD)
  • CSI (alpha) – currently only the GCE PD CSI driver has implemented topology support

Design Principles

While the initial set of supported plugins are all zonal-based, we designed this feature to adhere to the Kubernetes principle of portability across environments. Topology specification is generalized and uses a similar label-based specification like in Pod nodeSelectors and nodeAffinity. This mechanism allows you to define your own topology boundaries, such as racks in on-premise clusters, without requiring modifications to the scheduler to understand these custom topologies.

In addition, the topology information is abstracted away from the pod specification, so a pod does not need knowledge of the underlying storage system’s topology characteristics. This means that you can use the same pod specification across multiple clusters, environments, and storage systems.

Getting Started

To enable this feature, all you need to do is to create a StorageClass with volumeBindingMode set to WaitForFirstConsumer:

kind: StorageClass
apiVersion: storage.k8s.io/v1
metadata:
  name: topology-aware-standard
provisioner: kubernetes.io/gce-pd
volumeBindingMode: WaitForFirstConsumer
parameters:
  type: pd-standard

This new setting instructs the volume provisioner to not create a volume immediately, and instead, wait for a pod using an associated PVC to run through scheduling. Note that previous StorageClass zone and zones parameters do not need to be specified anymore, as pod policies now drive the decision of which zone to provision a volume in.

Next, create a pod and PVC with this StorageClass. This sequence is the same as before, but with a different StorageClass specified in the PVC. The following is a hypothetical example, demonstrating the capabilities of the new feature by specifying many pod constraints and scheduling policies:

  • multiple PVCs in a pod
  • nodeAffinity across a subset of zones
  • pod anti-affinity on zones
apiVersion: apps/v1
kind: StatefulSet
metadata:
  name: web
spec:   
  serviceName: "nginx"
  replicas: 2
  selector:
    matchLabels:
      app: nginx
  template:
    metadata:
      labels:
        app: nginx
    spec:
      affinity:
        nodeAffinity:
          requiredDuringSchedulingIgnoredDuringExecution:
            nodeSelectorTerms:
            - matchExpressions:
              - key: failure-domain.beta.kubernetes.io/zone
                operator: In
                values:
                - us-central1-a
                - us-central1-f
        podAntiAffinity:
          requiredDuringSchedulingIgnoredDuringExecution:
          - labelSelector:
              matchExpressions:
              - key: app
                operator: In
                values:
                - nginx
            topologyKey: failure-domain.beta.kubernetes.io/zone
      containers:
      - name: nginx
        image: gcr.io/google_containers/nginx-slim:0.8
        ports:
        - containerPort: 80
          name: web
        volumeMounts:
        - name: www
          mountPath: /usr/share/nginx/html
        - name: logs
          mountPath: /logs
 volumeClaimTemplates:
  - metadata:
      name: www
    spec:
      accessModes: [ "ReadWriteOnce" ]
      storageClassName: topology-aware-standard
      resources:
        requests:
          storage: 10Gi
  - metadata:
      name: logs
    spec:
      accessModes: [ "ReadWriteOnce" ]
      storageClassName: topology-aware-standard
      resources:
        requests:
          storage: 1Gi

Afterwards, you can see that the volumes were provisioned in zones according to the policies set by the pod:

$ kubectl get pv -o=jsonpath='{range .items[*]}{.spec.claimRef.name}{"\t"}{.metadata.labels.failure\-domain\.beta\.kubernetes\.io/zone}{"\n"}{end}'
www-web-0       us-central1-f
logs-web-0      us-central1-f
www-web-1       us-central1-a
logs-web-1      us-central1-a

How can I learn more?

Official documentation on the topology-aware dynamic provisioning feature is available here:
https://kubernetes.io/docs/concepts/storage/storage-classes/#volume-binding-mode

Documentation for CSI drivers is available at https://kubernetes-csi.github.io/docs/

What’s next?

We are actively working on improving this feature to support:

  • more volume types, including dynamic provisioning for local volumes
  • dynamic volume attachable count and capacity limits per node

How do I get involved?

If you have feedback for this feature or are interested in getting involved with the design and development, join the Kubernetes Storage Special-Interest-Group (SIG). We’re rapidly growing and always welcome new contributors.

Special thanks to all the contributors that helped bring this feature to beta, including Cheng Xing (verult), Chuqiang Li (lichuqiang), David Zhu (davidz627), Deep Debroy (ddebroy), Jan Šafránek (jsafrane), Jordan Liggitt (liggitt), Michelle Au (msau42), Pengfei Ni (feiskyer), Saad Ali (saad-ali), Tim Hockin (thockin), and Yecheng Fu (cofyc).

  • Dec 31 / 2018
  • 0
Hi Tech

Blog: 2018 Steering Committee Election Results

Authors: Jorge Castro (Heptio), Ihor Dvoretskyi (CNCF), Paris Pittman (Google)

Results

The Kubernetes Steering Committee Election is now complete and the following candidates came ahead to secure two year terms that start immediately:

Big Thanks!

  • Steering Committee Member Emeritus Quinton Hoole for his service to the community over the past year. We look forward to
  • The candidates that came forward to run for election. May we always have a strong set of people who want to push community forward like yours in every election.
  • All 307 voters who cast a ballot.
  • And last but not least…Cornell University for hosting CIVS!

Get Involved with the Steering Committee

You can follow along to Steering Committee backlog items and weigh in by filing an issue or creating a PR against their repo. They meet bi-weekly on Wednesdays at 8pm UTC and regularly attend Meet Our Contributors.

Steering Committee Meetings:

Meet Our Contributors Steering AMA’s:

  • Dec 31 / 2018
  • 0
Hi Tech

Blog: Kubernetes 2018 North American Contributor Summit

Authors:
Bob Killen (University of Michigan)
Sahdev Zala (IBM),
Ihor Dvoretskyi (CNCF)

The 2018 North American Kubernetes Contributor Summit to be hosted right before
KubeCon + CloudNativeCon Seattle is shaping up to be the largest yet.
It is an event that brings together new and current contributors alike to
connect and share face-to-face; and serves as an opportunity for existing
contributors to help shape the future of community development. For new
community members, it offers a welcoming space to learn, explore and put the
contributor workflow to practice.

Unlike previous Contributor Summits, the event now spans two-days with a more
relaxed ‘hallway’ track and general Contributor get-together to be hosted from
5-8pm on Sunday December 9th at the Garage Lounge and Gaming Hall, just
a short walk away from the Convention Center. There, contributors can enjoy
billiards, bowling, trivia and more; accompanied by a variety of food and drink.

Things pick up the following day, Monday the 10th with three separate tracks:

New Contributor Workshop:

A half day workshop aimed at getting new and first time contributors onboarded
and comfortable with working within the Kubernetes Community. Staying for the
duration is required; this is not a workshop you can drop into.

Current Contributor Track:

Reserved for those that are actively engaged with the development of the
project; the Current Contributor Track includes Talks, Workshops, Birds of a
Feather, Unconferences, Steering Committee Sessions, and more! Keep an eye on
the schedule in GitHub as content is frequently being updated.

Docs Sprint:

SIG-Docs will have a curated list of issues and challenges to be tackled closer
to the event date.

To Register:

To register for the Contributor Summit, see the Registration section of the
Event Details in GitHub
. Please note that registrations are being
reviewed. If you select the “Current Contributor Track” and are not an active
contributor, you will be asked to attend the New Contributor Workshop, or asked
to be put on a waitlist. With thousands of contributors and only 300 spots, we
need to make sure the right folks are in the room.

If you have any questions or concerns, please don’t hesitate to reach out to
the Contributor Summit Events Team at community@kubernetes.io.

Look forward to seeing everyone there!

  • Dec 31 / 2018
  • 0
Hi Tech

Blog: Tips for Your First Kubecon Presentation – Part 1

Author: Michael Gasch (VMware)

First of all, let me congratulate you to this outstanding achievement. Speaking at KubeCon, especially if it’s your first time, is a tremendous honor and experience. Well done!


When I was informed that my KubeCon talk about Kubernetes Resource Management was accepted for KubeCon EU in Denmark (2018), I really could not believe it. By then, the chances to get your talk accepted were around 10% (or less, don’t really remember the exact number). There were over a 1,000 submissions just for that KubeCon (recall that we now have three KubeCon events during the year – US, EU and Asia region). The popularity of Kubernetes is ever increasing and so is the number of people trying to get a talk accepted. Once again, outstanding achievement to get your talk in!

But now comes the tough part – research, write, practice, repeat, go on stage, perform 🙂 Let me tell you that I went through several sleepless nights preparing for my first KubeCon talk. The day of the presentation, until I got on stage, was a mixture of every emotion I could have possibly gone through. Even though I had presented uncountable times before, including large industry conferences, KubeCon was very different. Different because it was the first time everything was recorded (including the presenter on stage) and I did not really know the audience, or more precisely: I was assuming everyone in the room is a Kubernetes expert and that my presentation not only had to be entertaining but also technically deep and 100% accurate. It’s not seldom that maintainers and SIG (Special Interest Group) leads are in the room as well.

Another challenge for me was squeezing a topic, that can easily fill a full-day workshop, into a 35min presentation (including Q&A). Before KubeCon, I was used to giving breakouts which were typically 60 minutes long. This doesn’t say anything about the quality of the presentation but I knew how many slides I can squeeze into 60 minutes, covering important details but not killing people with “Death by PowerPoint”.

So I learned a lot going through this endless cycle of preparation, practicing, these doubts of failing and time pressure finishing your deck, and of course giving the talk. When I left Copenhagen, I took some notes based on my speaker experience during the flight, which my friend Bjoern encouraged me to share. Not all of them might apply to you, but I still hope some of them are useful for your first KubeCon talk.

Submitting a Good Talk

Some of you might read these lines even though you did not submit a talk or it wasn’t accepted. I found these resources (not specifically targeted at KubeCon) for writing a good proposal very useful:

Believe it or not, mine went through several reviews by Justin Garrison, Liz Rice, Bill Kennedy, Emad Benjamin and Kelsey Hightower (yes, THE Kelsey Hightower)! Some of them didn’t know me before, they just live by our community values to grow newcomers and thus drive this great community forward every day.

I think, without their feedback my proposal wouldn’t have been on point to be selected. Their feedback was often direct and required me to completely change the first revisions. But they were right and their feedback was useful to stay within the character limit while still standing out with the proposal.

Feel free to reach out for professional and/or experienced speakers. They know this stuff. And I was surprised by the support and help offered. Many had their DMs in Twitter open, so ask for help and you will be helped 🙂 Besides Twitter, related forums to ask for assistance might be Discuss and Reddit.

Preparing for your Presentation

Tip #1 – Appreciate that you were selected and don’t be upset about the slot your presentation was scheduled in. For example, my talk was put as second last presentation of final KubeCon day (Friday). I was like, who’s going to stay there and not catch his/her flight or hang out and relax after this crazy week? The session stats, where speakers can see who signed up, were slowly increasing until the week of KubeCon. I think at the beginning of the week it showed ~80 people interested in my session (there is no mandatory sign-up). I was so happy, especially since there were some interesting talks running at the same time as my presentation.

Without spoiling (see below), the KubeCon community and attendees fully leverage the time and effort they’ve put into traveling to KubeCon. Rest assured that even if you have the last presentation at KubeCon, people will show up!

Tip #2 – Study the Masters on Youtube. Get some inspirations from great speakers (some of them already mentioned above) and top rated sessions of previous KubeCons. Observe how they present and interact with the audience, while still keeping the tough timing throughout the presentation.

Tip #3 – Find reviewers. Having experienced or professional speakers review your slides is super critical. Not only to check for language/translation (see below) but also to improve the flow of your presentation and get feedback on whether the content is logically structured and not too dense (too many slides, timing). They will help you to leave out less important information while also making the presentation fit for your audience (not everyone has the level of knowledge as you in your specific area).

Tip #4 – Language barriers. Nobody is perfect and the community encourages diversity. This makes us all better and is what I probably like the most about the Kubernetes community. However, make sure that the audience understands the message of your talk. For non-native speakers, it can be really hard to present in English (e.g. at the US/EU conferences), especially if you’re not used to it. Add to that the tension during the talk and it can become really hard for the audience to follow.

I am not saying that everyone has to present in perfect business English. Nobody expects that, let me be very clear. But if you feel that this could be an issue for you, reach out for help. Reviewers can help fix grammar and wording in your slide deck. Practicing and recording yourself (see below) are helpful to reflect yourself. The slides should reflect your message so people can read along if they lost you. Simple, less busy slides are definitely recommended. Make sure to add speaker notes to your presentation. Not only does this help with getting better every time you run through your presentation (memory effect and the flow). It also serves as a safety net when you think language will definitely be an issue, or when you’re suddenly completely lost during the presentation on stage.

Tip #5 – Study the Speaker Guidelines. Nothing to add here, take them seriously and reach out to the (fantastic) speaker support if you have questions. Also submit your presentation in time (plan ahead accordingly) to not risk any trouble with the committee.

Tip #6 – Practice like never before. Practicing is probably the most important tip I can give you. I don’t know how many times I practiced my talk, e.g. at home but also at some local Meetups to get some early feedback. First I was shocked with timing. Even though I had my deck down to 40min in my dry runs at home, at the Meetup I completely run out of time (50min). I was shocked, as I didn’t know what to leave out.

The feedback from these sessions helped me to trim down content as it helped me to understand what to leave out/shorten. Keep in mind to also leave room for questions as a best practice (requirement?) by the speaker guidelines.

Tip #7 – The Demo Gods are not always with you. Demos can and will go wrong. Not just because of the typical suspect like slow WiFi, etc. I heard horror stories about expired certificates, daylight saving times (for those traveling through time zones on their way to KubeCon) affecting deployments, the content of a variable in your BASH script changing (e.g. when curling stuff from the web), keyboards breaking (Mac lovers, can you believe that?), hard disks crashing (even the backup disk not working), and so on.

Never ever rely on the demo gods, especially when you’re not Kelsey Hightower 🙂 Take video recordings of your demos so you not only have a backup when the live demo breaks. But also in case you’re afraid of running out of time. In order to avoid the primary and backup disks crashing (yes, it happened at that KubeCon I was told), store a copy at your trusted cloud provider.

Tip #8 – The right Tools for the job. Sometimes you want to highlight something on your slide. This has two potentially issues. First, you have to constantly turn away from the audience which does not necessarily look good (if you can avoid it). Second, it might not always work depending on the (laser) pointer and room equipment (light, background).

This presenter from Logitech has really served me well. It has several useful features, the “Spotlight” (that’s why the name) being my favorite feature. You’ll never want to go back.

Tip #9 – Being recorded. I am not sure if you can opt-out from being recorded (please check with speaker support on the latest guidelines here) if you don’t want to appear on Youtube for the rest of your life. But audio definitely will be recorded so chose your words (jokes) wisely. Again, practicing and reviewing helps. If you’re ok with being recorded, at least think about which shirt (logos and “art”) you want to be remembered by the internet 😉

Tip #10 – Social media. Social media is great for promoting your session and you should definitely send out reminders on various channels for your presentation. Something that is missing almost every time in the presentation templates (if you want to use them) is placeholders for your social media account and, more importantly, for your session ID. Even if the conference does not use session IDs externally (in the schedule builder), you might still want to add a handle to every slide so people can refer to your presentation (or particular slide) on social media with a hashtag that you then can search for feedback, questions, etc.

Tip #11 – Be yourself. Be authentic and don’t try to sound super smart or funny (unless you are ;)). Seriously. Just be yourself and people will love you. Authenticity is key for a great presentation and the audience will smell when you try to fool them. It also makes practicing and the live performance easier as you don’t have to pay attention on acting like somebody else.

From a content perspective make sure that you own and develop the content and you did not copy and paste like crazy from the Kubernetes docs or other presentations. It’s absolutely ok to reference other sources, but please give them credit. Again, the audience will smell if you make things up. You should know what you’re speaking about (not saying that you have to be an expert, but experience is what makes your talk unique). The final proof is during Q&A and KubeCon is a sharp audience 😉

Tip #12 – Changes to the proposal. The committee, based on your proposal description and details, might change the audience level. For example, I put my talk in as intermediate, but it was changed to all skill levels. This is not bad per se. Just watch out for changes and adapt your presentation accordingly or reach out to speaker support. If you were not expecting beginners or architects in your talk (because you had chosen another skill level and target group), you might lose parts of your audience. This could also negatively affect your session feedback/scores.

Wrapping up

I hope some of these tips are already useful and will help you getting started to work on your presentation. In the next post we are going to cover speaker tips when you are finally at the KubeCon event.

  • Dec 31 / 2018
  • 0
Hi Tech

Blog: Tips for Your First Kubecon Presentation – Part 2

Author: Michael Gasch (VMware)

Hello and welcome back to the second and final part about tips for KubeCon first-time speakers. If you missed the last post, please give it a read here.

The Day before the Show

Tip #13 – Get enough sleep. I don’t know about you, but when I don’t get enough sleep (especially when beer is in the game), the next day my brain power is around 80% at best. It’s very easy to get distracted at KubeCon (in a positive sense). “Let’s have dinner tonight and chat about XYZ”. Get some food, beer or wine because you’re so excited and all the good resolutions you had set for the day before your presentation are forgotten 🙂

OK, I’m slightly exaggerating here. But don’t underestimate the dynamics of this conference, the amazing people you meet, the inspiring talks and of course the conference party. Be disciplined, at least that one day. There’s enough time to party after your great presentation!

Tip #14 – A final dry-run. Usually, I do a final dry-run of my presentation the day before the talk. This helps me to recall the first few sentences I want to say so I keep the flow no matter what happens when the red recording light goes on. Especially when your talk is later during the conference, there’s so much new stuff your brain has to digest which could “overwrite” the very important parts of your presentation. I think you know what I mean. So, if you’re like me, a final dry-run is never a bad idea (also to check equipment, demos, etc.).

Tip #15 – Promote your session, again. Send out a final reminder on your social media channels so your followers (and KubeCon attendees) will recall to attend your session (again, KubeCon is busy and it’s hard to keep up with all the talks you wanted to attend). I was surprised to see my attendee list jumping from ~80 at the beginning of the week to >300 the day before the talk. The number kept rising even an hour before going on stage. So don’t worry about the stats too early.

Tip #16 – Ask your idols to attend. Steve Wong, a colleague of mine who I really admire for his knowledge and passion, gave me a great advise. Reach out to the people you always wanted to attend your talk and kindly ask them to come along.

So I texted the one and only Tim Hockin. Even though these well-respected community leaders are super busy and thus usually cannot attend many talks during the conference, the worst thing that can happen is that they cannot show up and will let you know. (see the end of this post to find out whether or not I was lucky :))

The show is on!

Your day has come and it doesn’t make any sense to make big changes to your presentation now! Actually, that’s a very bad idea unless you’re an expert and your heartbeat at rest is around 40 BPM. (But even then many things can go horribly wrong).

So, without further ado, here are my final tips for you.

Tip #17 – Arrive ahead of time. Set an alert (or two) to not miss your presentation, e.g. because somebody caught you on the way to the room or you got a call/have been pulled in a meeting. It’s a good idea to find out were your room is at least some hours before your talk. These conference buildings can be very large. Also look for last minute schedule (time/room) changes, just because you never know…

Tip #18 – Ask a friend to take photos. My dear colleague Bjoern, without me asking for it, took a lot of pictures and watched the audience during the talk. This was really helpful, not just because I now have some nice shots that will always remind me of this great day. He also gave me honest feedback, e.g. what people said, whether they liked it or what I could have done better.

Tip #19 – Restroom. If you’re like me, when I’m nervous I could run every 15 minutes. The last thing you want is that you are fully cabled (microphone), everything is set up and two minutes before your presentation you feel like “oh oh”…nothing more to say here 😉

Tip #20 – The audience. I had many examples and references from other Kubernetes users (and their postmortem stories) in my talk. So I tried to give them credit and actually some of them were in the room and really liked that I did so. It gave them (and hopefully the rest of the audience as well) the feeling that I did not invent the wheel and we are all in the same boat. Also feel free to ask some questions in the beginning, e.g. to get a better feeling about who is attending your talk, or who would consider himself an expert in the area of what you are talking about, etc.

Tip #21 – Repeat questions. Always. Because of the time constraints, questions should be asked at the end of your presentation (unless you are giving a community meeting or panel of course). Always (always!) repeat the questions at the end. Sometimes people will not use the microphone. This is not only hard for the people in the back, but also it won’t be captured on the recording. I am sure you also had that moment watching a recording and not getting what is being asked/discussed because the question was not captured.

Tip #22 – Feedback. Don’t forget to ask the audience to fill out the survey. They’re not always enforced/mandatory during conferences (especially not at KubeCon), so it’s easy to forget to give the speaker feedback. Feedback is super critical (also for the committee) as sometimes people won’t directly tell you but rather write their thoughts. Also, you might want to block your calendar to leave some time after the presentation for follow-up questions, so you are not in the hurry to catch your next meeting/session.

Tip #23 – Invite your audience. No, I don’t mean to throw a round of beer for everyone attending your talk (I mean, you could). But you might let them know, at the end of your presentation, that you would like to hang out, have dinner, etc. A great opportunity to reflect and geek out with like-minded friends.

Final Tip – Your Voice matters. Don’t underestimate the power of giving a talk at a conference. In my case I was lucky that the Zalando crew was in the room and took this talk as an opportunity for an ad hoc meeting after the conference. This drove an important performance fix forward, which eventually was merged (kudos to the Zalando team again!).

Embrace the opportunity to give a talk at a conference, take it serious, be professional and make the best use of your time. But I’m sure I don’t have to tell you that 😉

Now it’s on you 🙂

I hope some of these tips are useful for you as well. And I wish you all the best for your upcoming talk!!! Believing in and being yourself is key to success. And perhaps your Kubernetes idol is in the room and has some nice words for you after your presentation!

Besides my fantastic reviewers and the speaker support team already mentioned above, I also would like to thank the people who supported me along this KubeCon journey: Bjoern, Timo, Emad and Steve!

  • Dec 31 / 2018
  • 0
Hi Tech

Blog: gRPC Load Balancing on Kubernetes without Tears

Author: William Morgan (Buoyant)

Many new gRPC users are surprised to find that Kubernetes’s default load
balancing often doesn’t work out of the box with gRPC. For example, here’s what
happens when you take a simple gRPC Node.js microservices
app
and deploy it on Kubernetes:

While the voting service displayed here has several pods, it’s clear from
Kubernetes’s CPU graphs that only one of the pods is actually doing any
work—because only one of the pods is receiving any traffic. Why?

In this blog post, we describe why this happens, and how you can easily fix it
by adding gRPC load balancing to any Kubernetes app with
Linkerd, a CNCF service mesh and service sidecar.

Why does gRPC need special load balancing?

First, let’s understand why we need to do something special for gRPC.

gRPC is an increasingly common choice for application developers. Compared to
alternative protocols such as JSON-over-HTTP, gRPC can provide some significant
benefits, including dramatically lower (de)serialization costs, automatic type
checking, formalized APIs, and less TCP management overhead.

However, gRPC also breaks the standard connection-level load balancing,
including what’s provided by Kubernetes. This is because gRPC is built on
HTTP/2, and HTTP/2 is designed to have a single long-lived TCP connection,
across which all requests are multiplexed—meaning multiple requests can be
active on the same connection at any point in time. Normally, this is great, as
it reduces the overhead of connection management. However, it also means that
(as you might imagine) connection-level balancing isn’t very useful. Once the
connection is established, there’s no more balancing to be done. All requests
will get pinned to a single destination pod, as shown below:

Why doesn’t this affect HTTP/1.1?

The reason why this problem doesn’t occur in HTTP/1.1, which also has the
concept of long-lived connections, is because HTTP/1.1 has several features
that naturally result in cycling of TCP connections. Because of this,
connection-level balancing is “good enough”, and for most HTTP/1.1 apps we
don’t need to do anything more.

To understand why, let’s take a deeper look at HTTP/1.1. In contrast to HTTP/2,
HTTP/1.1 cannot multiplex requests. Only one HTTP request can be active at a
time per TCP connection. The client makes a request, e.g. GET /foo, and then
waits until the server responds. While that request-response cycle is
happening, no other requests can be issued on that connection.

Usually, we want lots of requests happening in parallel. Therefore, to have
concurrent HTTP/1.1 requests, we need to make multiple HTTP/1.1 connections,
and issue our requests across all of them. Additionally, long-lived HTTP/1.1
connections typically expire after some time, and are torn down by the client
(or server). These two factors combined mean that HTTP/1.1 requests typically
cycle across multiple TCP connections, and so connection-level balancing works.

So how do we load balance gRPC?

Now back to gRPC. Since we can’t balance at the connection level, in order to
do gRPC load balancing, we need to shift from connection balancing to request
balancing. In other words, we need to open an HTTP/2 connection to each
destination, and balance requests across these connections, as shown below:

In network terms, this means we need to make decisions at L5/L7 rather than
L3/L4, i.e. we need to understand the protocol sent over the TCP connections.

How do we accomplish this? There are a couple options. First, our application
code could manually maintain its own load balancing pool of destinations, and
we could configure our gRPC client to use this load balancing
pool
. This approach gives
us the most control, but it can be very complex in environments like Kubernetes
where the pool changes over time as Kubernetes reschedules pods. Our
application would have to watch the Kubernetes API and keep itself up to date
with the pods.

Alternatively, in Kubernetes, we could deploy our app as headless
services
.
In this case, Kubernetes will create multiple A
records

in the DNS entry for the service. If our gRPC client is sufficiently advanced,
it can automatically maintain the load balancing pool from those DNS entries.
But this approach restricts us to certain gRPC clients, and it’s rarely
possible to only use headless services.

Finally, we can take a third approach: use a lightweight proxy.

gRPC load balancing on Kubernetes with Linkerd

Linkerd is a CNCF-hosted service
mesh
for Kubernetes. Most relevant to our purposes, Linkerd also functions as
a service sidecar, where it can be applied to a single service—even without
cluster-wide permissions. What this means is that when we add Linkerd to our
service, it adds a tiny, ultra-fast proxy to each pod, and these proxies watch
the Kubernetes API and do gRPC load balancing automatically. Our deployment
then looks like this:

Using Linkerd has a couple advantages. First, it works with services written in
any language, with any gRPC client, and any deployment model (headless or not).
Because Linkerd’s proxies are completely transparent, they auto-detect HTTP/2
and HTTP/1.x and do L7 load balancing, and they pass through all other traffic
as pure TCP. This means that everything will just work.

Second, Linkerd’s load balancing is very sophisticated. Not only does Linkerd
maintain a watch on the Kubernetes API and automatically update the load
balancing pool as pods get rescheduled, Linkerd uses an exponentially-weighted
moving average
of response latencies to automatically send requests to the
fastest pods. If one pod is slowing down, even momentarily, Linkerd will shift
traffic away from it. This can reduce end-to-end tail latencies.

Finally, Linkerd’s Rust-based proxies are incredibly fast and small. They
introduce <1ms of p99 latency and require <10mb of RSS per pod, meaning that
the impact on system performance will be negligible.

gRPC Load Balancing in 60 seconds

Linkerd is very easy to try. Just follow the steps in the Linkerd Getting
Started Instructions
—install the
CLI on your laptop, install the control plane on your cluster, and “mesh” your
service (inject the proxies into each pod). You’ll have Linkerd running on your
service in no time, and should see proper gRPC balancing immediately.

Let’s take a look at our sample voting service again, this time after
installing Linkerd:

As we can see, the CPU graphs for all pods are active, indicating that all pods
are now taking traffic—without having to change a line of code. Voila,
gRPC load balancing as if by magic!

Linkerd also gives us built-in traffic-level dashboards, so we don’t even need
to guess what’s happening from CPU charts any more. Here’s a Linkerd graph
that’s showing the success rate, request volume, and latency percentiles of
each pod:

We can see that each pod is getting around 5 RPS. We can also see that, while
we’ve solved our load balancing problem, we still have some work to do on our
success rate for this service. (The demo app is built with an intentional
failure—as an exercise to the reader, see if you can figure it out by
using the Linkerd dashboard!)

Wrapping it up

If you’re interested in a dead simple way to add gRPC load balancing to your
Kubernetes services, regardless of what language it’s written in, what gRPC
client you’re using, or how it’s deployed, you can use Linkerd to add gRPC load
balancing in a few commands.

There’s a lot more to Linkerd, including security, reliability, and debugging
and diagnostics features, but those are topics for future blog posts.

Want to learn more? We’d love to have you join our rapidly-growing community!
Linkerd is a CNCF project, hosted on
GitHub
, and has a thriving community
on Slack, Twitter,
and the mailing lists. Come and
join the fun!